


-


「ブラミィ」(Blamy)/ スイッチブラケット
¥1,250($7.93)
SOLD OUT
ホビーウイングさんの1060のESCを タミヤRCキットの標準位置で使用できるパーツてす。 (BKBM-001) より手軽に使えるホビーウイングさんの1060のESC。 現在はOEMで同じ形状のESCが各メーカー様から発売されています。 このESCのスイッチ位置は、ESC本体の爪に固定するのが標準ですが タミヤRCの取扱説明書標準位置で固定できる様になるのが? この子「ブラミィ」です。 付属のM2のなべねじで、ESCのスイッチをブラミーに固定してから タミヤシャーシのスイッチ部M2のトラスネジで固定してください。 〜ブラミィの特徴〜 ・切り欠き部分からスイッチのON/OFFが確認できます。 →RCの進行方向にON側を向けて取り付けてください。 取説と同様の固定方法です。 ・固定面とスイッチ面には緩み対策として一定のクリアランスを設けています。 →締め付けすぎにご注意下さい。 OEMのスイッチには爪がついているものがありますので 取り外してから位置の確認をしてください。(WP-1060等) ブラミーはスイッチ面が、シャーシ内側の面に直接あてがわれるので スイッチの入り切り操作のストレスが低減します。 シャーシのレイアウトによっては、ESCの固定方法に工夫が必要になります。 ご確認ください。 取付難易度は★★⭐︎☆☆レベル2です。 ※スイッチ取付位置に合わせて、ESCの位置を変更する場合があります。 ※ネジが小さいので落下紛失にご注意ください。 ※ネジが小さいので締め付けすぎにご注意ください。 ※ For international shipping inquiries, please contact me directly through BASE messaging! 材 質:アルミ 板 厚:1t 個 数:1ケ 対 応:タミヤシャーシグラホⅠ・Ⅱ、DT02・03・04、ランチボ系、TT01・02、 ※CC01・02、M05、BBX、モンスタービートル、MB-01、BBX、ファイターネクシュジェン Cカー、等、 対応シャーシは日々更新しています。 日々対応機種確認中~ 付属品:各種M2ねじ(なべネジ×2(スイッチ固定用)、トラスねじ×2(ブラミー固定用)) 発 送:クリックポスト250円 仕 様:板金部品には製品面に加工上傷が入ることがあります。製品上問題はありません。 仕 様:スイッチ取付位置に合わせて、ESCの位置を変更する場合があります。 注 意:素材はアルミです過度に力を加えると変形します。 注 意:素材はアルミです過度に締め付けるとタップが壊れます。 注 意:取り付け方向でブラミィ固定ネジが干渉する場合があります。スペーサー等をご用意下さい。 “Blamy” / ESC Switch Bracket Blamy is a switch bracket designed to allow the Hobbywing 1060 ESC to use the standard switch mounting position specified in Tamiya RC kit instructions. Product Code: BKBM-001 The Hobbywing 1060 is a simple, affordable, and widely used ESC. Today, ESCs with the same basic shape are also available from various manufacturers as OEM products. Normally, the power switch for this type of ESC is clipped directly onto the ESC body. But what if you want to mount that switch neatly in the standard switch position shown in a Tamiya instruction manual? That is exactly what this little guy is for. Blamy. Installation First, secure the ESC power switch to Blamy using the included M2 pan-head screws. Then mount Blamy to the Tamiya chassis using the M2 truss-head screws at the standard switch mounting position. Features of Blamy Easy ON/OFF Identification The cutout in Blamy allows you to visually confirm the ON/OFF position of the switch. Install the switch so that the ON side faces toward the front of the RC car. This follows the same basic orientation used in Tamiya instruction manuals. Designed-In Clearance A small amount of clearance is intentionally provided between the mounting surface and the switch surface. This helps reduce the risk of loosening and allows the switch to sit securely. Please be careful not to over-tighten the screws. Compatibility with OEM-Type Switches Some OEM versions of this ESC use switches with small mounting tabs or claws. For models such as the WP-1060, these tabs may need to be removed before checking the correct mounting position. Please confirm the switch shape before installation. Reduced Stress During Switch Operation With Blamy installed, the switch surface is supported directly against the inner surface of the chassis. This helps reduce movement and stress when turning the power switch ON and OFF. It also gives the switch a more solid and natural operating feel. ESC Position Depending on the chassis layout, you may need to adjust or reconsider the mounting position of the ESC itself. Please confirm the available space and cable routing on your chassis before final installation. Installation Difficulty ★★☆☆☆ Level 2 / 5 * The ESC position may need to be changed depending on the switch mounting location. * The included screws are very small, so please take care not to drop or lose them. * Because the screws are small, please be careful not to over-tighten them. For international shipping inquiries, please contact me directly through BASE messaging! Specifications Product Name: Blamy Product Code: BKBM-001 Material: Aluminum Thickness: 1.0 mm Quantity: 1 bracket Compatible ESC Type: Hobbywing 1060 and compatible OEM-type ESC switches with the same basic shape Compatible Tamiya Chassis: Confirmed or currently being checked for use with: * Grasshopper I / II * DT-02 * DT-03 * DT-04 * Lunch Box series * TT-01 * TT-02 * CC-01 * CC-02 * M-05 * BBX * Monster Beetle * MB-01 * Fighter NXGEN * Tamiya Group C Cars * and other compatible chassis Compatible chassis are being tested and updated continuously. Included Hardware * 2 × M2 pan-head screws for securing the ESC switch * 2 × M2 truss-head screws for securing Blamy to the chassis Shipping in Japan: Click Post ¥250 Product Notes Because this is a sheet-metal component, minor scratches or processing marks may be present on the product surface as a result of manufacturing. These marks do not affect product performance or functionality. Depending on the switch mounting position, the ESC mounting location may need to be adjusted. Caution Blamy is made from aluminum. Applying excessive force may bend or deform the bracket. The threaded sections are also aluminum. Over-tightening the screws may damage or strip the threads. Depending on the installation direction and chassis layout, the Blamy mounting screws may interfere with surrounding parts. If necessary, please prepare suitable spacers or other adjustment parts to create sufficient clearance.
MORE -


ハードフロントAアームエイドセット /タミヤCカー用
¥4,070($25.83)
2007年より再販を続けている、タミヤCカーシリーズ 単純と思われるシャーシ構造の中に、ロマンがたくさん詰まっているCカー。 販売当時とシャーシ構造が同じだからこそ、 奥が深く味わい深い1台です。 そして! レイテックサーキットで開催される 【2025 ロマン2.4h グループP(OP搭載クラス)】で 使用可能と言う大変光栄なパーツ指定を頂きました! :開発コンセプト: コース周回中にコーナーにヒットして、フロントAアームが曲がり、 プライヤーで戻すも、キャンバー角度もキャスター角度もガタガタになりサポート商品を待つ日々。 そんな悲しい時間を極力減らすと、それはエンジョイRCライフだ! が、開発コンセプトです!! F1シャーシよりは、フロントタイヤに直接ヒットさせることは少ないですが。 それでもヒットの際は、ステアリングを切っていることが多くAアームへの負担は大きいです。 万が一曲がってしまっても、プライヤーなどで戻せるのですが成形品の寸法に戻す事は不可能でした。 更にDDの挙動を一度ヒットしたAアームで制御するのは至難の業と思っております。 ズバリ!転ばぬ先の杖です。 もとい!曲がる前のAアームエイドです! 本商品は、お持ちのフロントAアームに追加工が必要ですが、 取り付けて剛性が上がるのでコーナー時の過重と挙動が、 タイヤ→アップライト→アップライトスプリング→アームと、 順に伝わることで、マシンの挙動がわかりやすくなります。 そしてセッティングも順を追って確認できるので、ますますCカーが好きになると思います。 そんな私も、そのうちに一人ですし。 過度にヒットしてしまっても、Aアームの曲がりは極端に少なくなります。 取り付け後に、マシンセッティング変更が必要になる場合がございます。 ※全ての衝撃から守るものではありません。 ※ For international shipping inquiries, please contact me directly through BASE messaging! (BKHFA LR1) タミヤ Cカー用。 左右セット。 組み立て難易度は★★★★★(レベル5です) ※フロントAアームに追加工が必要です。 Φ3でのドリル貫通作業とリーマー加工を推奨します。 :装着による確認される効果: ・軽度のフロント部ヒット時のAアームの曲がり低減。 ・主にコーナーでかかる荷重挙動がわかりやすくなる。 ・剛性UP ・Tバーのセッティング変化がわかりやすくなる。 材 質:SUS304 板 厚:1.0t 寸 法:40mm×20mm 内容物:ハードフロントAアームエイドセット(右・左各1個) 対 応:タミヤCカー TAMIYA Group C Car 付属品:①M3x28六角穴付きボルトx2、②インシュロック×2 ③ナット×2 ④スプリングワッシャ×2 発 送:クリックポスト250円 仕 様:板金部品には製品面に加工上傷が入ることがあります。製品上問題はありません。 仕 様:取り付け後にマシンセッティング変更が必要になる場合もございます。 仕 様:対象シャーシへの取付は付属のネジをご利用下さい。 仕 様:お持ちのフロントアームにキリでの追加工が必要となります。 推奨はΦ3のキリです。大きすぎる穴はガタの原因となります。 加工実績から最大径で3.2mmとなります。(多少ガタあり) Hard Front A-Arm Aid Set / For Tamiya Group C Cars The Tamiya Group C series has continued to be reissued since 2007. At first glance, the chassis structure may seem simple. But inside that simplicity is a huge amount of character, history, and pure RC romance. And because the basic chassis structure remains essentially the same as when these cars were originally released, they still offer incredible depth and enjoyment even today. And now, we have some very special news. This part has been officially approved for use in the: “2025 Roman 2.4h Group P” OP-equipped class held at Raytech Circuit. It is a great honor for us to have this product recognized as an eligible part for the event. Development Concept Imagine this: You are running laps at the circuit. You clip a corner. The front A-arm bends. You try to straighten it back with pliers, but now the camber angle and caster angle are both out. And then you are left waiting for replacement or support parts before you can really enjoy the car again. I wanted to reduce those frustrating moments as much as possible. Because fewer broken parts and less downtime means more time enjoying RC. That is the basic development concept behind this product. Compared with an F1 chassis, direct impacts to the front tires may happen less frequently on a Group C car. But when an impact does happen, the steering is often already turned. That can place a surprisingly large load on the A-arm. If the A-arm bends, it may be possible to bend it back with pliers or another tool. However, returning it precisely to its original molded dimensions is extremely difficult. And with a direct-drive chassis, trying to control the car accurately using an A-arm that has already been bent once can become very difficult. So this product is, quite simply: A little prevention before trouble happens. Or rather… An A-Arm Aid before the arm bends! What This Product Does This product requires additional modification to your existing front A-arms before installation. However, once installed, it increases front A-arm rigidity. That added rigidity can help make the load path through the front suspension easier to understand: Tire → Upright → Upright Spring → A-Arm By making the way the load moves through the front end more noticeable, the behavior of the car during cornering can become easier to read. That also makes it easier to evaluate setup changes step by step. And the more you understand the car… the more you may find yourself falling even deeper into the world of Tamiya Group C cars. I certainly did. Even in the event of a harder impact, the amount of A-arm bending can be significantly reduced compared with the standard setup. However, please note: This product does not protect the vehicle from every possible impact or crash. Depending on your setup, changes to the vehicle’s suspension or chassis settings may be required after installation. Product Code BKHFA LR1 For Tamiya Group C cars. Includes both left and right sides. Installation Difficulty ★★★★★ Level 5 / 5 This product requires modification of the existing front A-arms. A through-hole must be drilled in each A-arm. We recommend using a: Φ3.0 mm drill bit followed by careful reaming if necessary. Do not make the hole unnecessarily large, as excessive clearance may create unwanted play. Based on our installation experience, the maximum recommended hole diameter is approximately: 3.2 mm Please note that some play may already be present at this diameter. Confirmed Effects After Installation * Helps reduce A-arm bending during light front-end impacts * Makes front-end load behavior during cornering easier to understand * Increases front A-arm rigidity * Makes changes in T-bar setup easier to feel and evaluate Important Information * Additional machining of the existing front A-arms is required. * Vehicle setup changes may be necessary after installation. * Please use the included hardware when installing this product on the intended chassis. * This product is designed to reduce damage and deformation, but it cannot prevent damage from all crashes or impacts. For international shipping inquiries, please contact me directly through BASE messaging! Specifications Product Name: Hard Front A-Arm Aid Set Product Code: BKHFA LR1 Material: SUS304 Stainless Steel Thickness: 1.0 mm Dimensions: 40 mm × 20 mm Compatible Chassis: Tamiya Group C Car chassis Contents: * 1 × Right Hard Front A-Arm Aid * 1 × Left Hard Front A-Arm Aid Included Hardware: * 2 × M3 × 28 socket head bolts * 2 × cable ties * 2 × nuts * 2 × spring washers Shipping in Japan: Click Post ¥250 Product Notes Because this is a sheet-metal component, minor scratches or processing marks may be present on the product surface as a result of manufacturing. These marks do not affect product performance or functionality. After installation, changes to the vehicle setup may be required. Please use the included screws and hardware for installation on the intended chassis. Machining Note Your existing front A-arms must be drilled before installation. We recommend using a Φ3.0 mm drill bit. A hole that is too large may cause unwanted looseness or play. Based on our installation experience, approximately 3.2 mm is the maximum practical diameter, although some play may occur at this size. Please perform all drilling and reaming carefully. Improper machining may affect fit, alignment, and vehicle performance.
MORE -


「ファンブゥCC」/ タミヤ Cカー用 ファンブラケット
¥1,430($9.08)
2007年より再販を続けている、タミヤCカーシリーズ 単純と思われるシャーシ構造の中に、ロマンがたくさん詰まっているCカー。 その魅力にどっぷりとつかっている人のうちの一人でも私はあります。 販売当時とシャーシ構造が同じだからこそ、 奥が深く味わい深い1台ですよね。 「そんなCカーのモーターを、しっかりと冷やす!」 毎年毎年最高気温を更新する昨今です。 操縦者もRCも熱対策はしっかりとしたいですよね。 そんな時、この子「ファンブゥCC」がぴったりです! (BKCC-001) :開発コンセプト: パワーソースが変化し、ブラシレスモーターが多く採用されて ブラシドモーターと比較して走行時のモーター温度は低くなっていると思いますいが、 上昇し続ける外気温。 それに比例する路面温度の上昇。 人もRCも大変な夏場を乗り切るには、ファンブラケットを作らねば! が、開発コンセプトの一つです。 ファンブラケットを固定するのに、ギアケースに共じめせず リアダンパー固定アーム(シャーシ側)に共じめ固定の設計にしております。 既存タッピングビス「MC4 M3×18」を使用して固定をして下さい。 冷却ファンは別途ご用意ください。 ファンの固定は、M3をご利用ください。 ユーザー様からのお情報を追記です!! KAWADA製 モーターマウント&チューブダンパー装着車に、 なんと! シンデレラフィットで御座いましたのでご報告させて頂きます。 取り付けはモーターマウントとダンパーステーの間にファンステーを挟んで取り付けるとシャーシロール時にも干渉無く取り付ける事が出来ます。 と、タレコミを頂きました! カワダユーザー様!この機会に是非とも! 取付難易度は★★☆☆☆レベル2です。 ※既存部品との穴位置を確認して固定してください。 ※ For international shipping inquiries, please contact me directly through BASE messaging! 材 質:アルミ 板 厚:1.5t 個 数:1ケ 対 応:タミヤCカーシャーシ TAMIYA Group C Car 付属品:本体 発 送:クリックポスト250円 仕 様:板金部品には製品面に加工上傷が入ることがあります。製品上問題はありません。 仕 様:ファンの固定ネジは優しく締めこんで下さい。 仕 様:WBでファンの位置は変更します。 注 意:素材はアルミです過度に力を加えると変形します。 注 意:素材はアルミです過度に締め付けるとタップが壊れます。 注 意:本体は極力水平を意識して取り付けしてください。 “FANBoo CC” / Cooling Fan Bracket for Tamiya Group C Cars The Tamiya Group C series has continued to be reissued since 2007. At first glance, the chassis structure may look simple. But inside that simplicity is a huge amount of character, history, and pure RC romance. I am also one of the many people who have completely fallen for the charm of these Group C cars. And because the basic chassis structure remains essentially the same as when these cars were originally released, they still have incredible depth and character even today. That is part of what makes them so special. So we thought: “Let’s cool that Group C motor properly!” These days, it feels like the highest summer temperatures are being broken year after year. Both the driver and the RC car need proper protection from the heat. And when things get hot, this little guy is ready to help: FANBoo CC BKCC-001 Development Concept Modern RC power systems have changed dramatically. Brushless motors are now widely used, and compared with brushed motors, operating temperatures may often be lower. But there is another problem: The outside temperature keeps rising. And as the air temperature rises, so does the track surface temperature. Summer is becoming tougher for both people and RC cars. So one of the ideas behind this product was very simple: “If we want to survive those hot summer RC sessions, we need a proper fan bracket!” That became one of the development concepts behind FANBoo CC. Rather than securing the fan bracket together with the gearbox, FANBoo CC is designed to mount together with the rear damper mounting arm on the chassis side. Please use the existing Tamiya tapping screw: MC4 M3 × 18 mm to secure the bracket. The cooling fan itself is sold separately and must be prepared by the user. Please use M3 screws to attach your cooling fan to FANBoo CC. Compatibility Information from a User! We received some very useful information from one of our customers. And this one made us very happy. A Tamiya Group C car equipped with a: KAWADA motor mount and tube damper setup turned out to be an almost perfect fit! A true Cinderella fit. According to the user, FANBoo CC can be installed by positioning the fan bracket between the motor mount and the damper stay. With this installation method, the bracket can be mounted without interference even when the chassis rolls during driving. That was the information we received directly from the user. So, KAWADA users… This may be a very nice opportunity to add FANBoo CC to your machine! Installation Difficulty ★★☆☆☆ Level 2 / 5 Installation is relatively simple. Please confirm that the mounting holes align correctly with the existing parts before tightening everything into place. For international shipping inquiries, please contact me directly through BASE messaging! Specifications Product Name: FANBoo CC Product Code: BKCC-001 Material: Aluminum Thickness: 1.5 mm Quantity: 1 bracket Compatible Chassis: Tamiya Group C Car chassis Included Parts: FANBoo CC main bracket only Shipping in Japan: Click Post ¥250 Product Notes Because this is a sheet-metal component, minor scratches or processing marks may be present on the product surface as a result of manufacturing. These marks do not affect product performance or functionality. Please tighten the fan mounting screws gently. The cooling fan position may need to be changed depending on the vehicle’s wheelbase (WB). Caution The product is made from aluminum. Applying excessive force may bend or deform the bracket. The threaded sections are also aluminum. Over-tightening the screws may damage or strip the threads. Please tighten carefully. For best installation, mount the FANBoo CC body as horizontally and level as possible. The cooling fan shown in any example installation photos is not included unless specifically stated otherwise.
MORE -
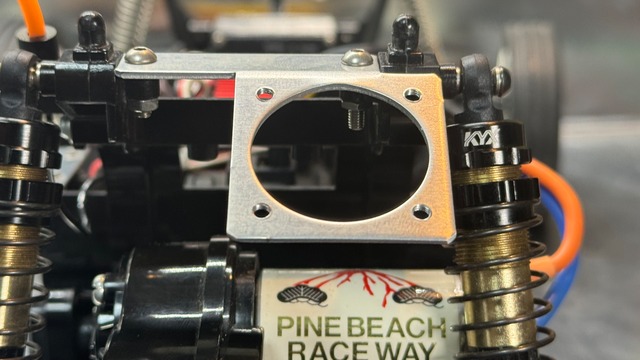

「ファンブゥ GⅡ」/ グラスホッパーⅡ専用ファンブラケット
¥1,540($9.77)
SOLD OUT
タミヤ グラスホッパーの販売から4年後に販売されたグラスホッパーⅡは 2017年に再版されてからも今もサーキットやイベントでよく書けます。 グラホと同様に、ロングセラーラジコンの内の1台です。 そう、グラホと合わせて複数台所有されている方が多いでしょう。 380モーター標準搭載。走りはまさに飛蝗のような走り。 ただ初代のグラホからは進化をしっかりしているのがグラホⅡ Ⅱの名に恥じないRCです! そんな、グラスホッパーⅡのモーターを冷やす商品を作りました。 「ファンブゥGⅡ」です。 (BKFG-002) :開発コンセプト: グラホのファンブゥがあるなら グラホⅡのファンブゥを作るのは 自然の摂理。 が、コンセプトです。 既に、DIYでつけている方も多いと思いますが、 ポン付けできる、ファンブゥGⅡは如何ですか? ※写真のファン本体は付属しません。 ※30ファンサイズ用です。 取付難易度は★★☆☆☆レベルⅡです。 材 質:アルミ 板 厚:1.5t 個 数:1ケ 対 応:タミヤグラスホッパーⅡ専用 付属品:M3トラスねじ×2、ナット×2 発 送:クリックポスト250円 仕 様:板金部品には製品面に加工上傷が入ることがあります。製品上問題はありません。 注 意:素材はアルミです過度に力を加えると変形します。 注 意:素材はアルミです過度に締め付けるとタップが壊れます。 ※ For international shipping inquiries, please contact me directly through BASE messaging!
MORE -

「ウィンピースC」(Win Peace C)/ タミヤ Cカー用
¥1,320($8.38)
2007年より再販を続けている、タミヤCカーシリーズ 単純と思われるシャーシ構造の中に、ロマンがたくさん詰まっているCカー。 その魅力にどっぷりとつかっている人のうちの一人でも私はあります。 販売当時とシャーシ構造が同じだからこそ、 奥が深く味わい深い1台。 「そんなCカーのウイングステイ根元に取り付けられる商品を開発しました。」 標準のウイングステイは、折れにくい樹脂を使用しています。 が、すこーしだけ頼りなく感じておりました。 Cカーの魅力は、30年以上形を変えずに現代のオンロードサーキットでも ぐんぐん遊べる一台です。 しかし、パワーソースも昔とは格段に変化した今。 ダウンフォースをもう少しだけ、力に変えたい。 そんな時、この子「ウィンピース」がお役に立つと思います! (BKWP-001) :開発コンセプト: パワーソースが変化し、Cカーのスピードに比例されて増幅するダウンフォース。 このダウンフォースをより効率よくマシンに伝えたい。 コーナーでぶれるウイングが気になっていたので作りました。 バタついたウイングが気になって、アクセルを戻した場面もありました。 そんな場面を少しでも低減出来たら。 そして、ダウンフォースをもう少し受けきってもらいたい。 そんな思いで開発しました。 ウイングステイを全て板金で作ることも出来ますが、 大きなクラッシュや追突で二次災害の懸念もあるため、 そっと差し入れて、ムフフ。としてもらいたいです。 ん?適当なシャフトで代用できる? はい、そう思います。 ただ、小職は板金の美しさと機能性を伝えていくためにメーカーを立ち上げたので 板金にこだわり、形状の試行錯誤を繰り返し開発しました。 あっ!M3のタップを底面に施していますので、 何か閃いた際にお使いください。 よろしくお願いいたします。 ~組み込みは簡単~ ① ウィンピースをステイの内部に入れ込みます。 ※切り欠きがフロント方向です。 ② 付属のスペーサをウイングステイの左右の小穴に差し込みます。 ※穴が変形している場合もありますので、垂直を意識して押し込みます。 ③ ワッシャを置きM3のトラスねじで固定します。 ※レンチにねじを指で押さえながらだと締め付けがしやすいです。 完成 ウィンピース本体が水平にとりつくように左右のねじを固定してください。 ※本製品を取り付けた事によりセッティング変更がご必要になる場合があります。 取付難易度は★★★☆☆レベル3です。 ※先に、本体をウイングステイの中に入れ込むと組み立て易いです。 ※付属のスペーサーは極力垂直に押し込んでください。 ※ワッシャーの組付けをお忘れないでください。 ※ For international shipping inquiries, please contact me directly through BASE messaging! 材 質:アルミ 板 厚:1.5t 個 数:1ケ 対 応:タミヤCカー TAMIYA Group C Car(C11 、787B、等) 標準ウイングステー使用 付属品:M3トラスねじ×2、M3用ワッシャ×2、1.5tスペーサー×2、 発 送:クリックポスト250円 仕 様:板金部品には製品面に加工上傷が入ることがあります。製品上問題はありません。 仕 様:スペーサーは垂直に押し込んでください。 注 意:素材はアルミです過度に力を加えると変形します。 注 意:素材はアルミです過度に締め付けるとタップが壊れます。 注 意:本体は極力水平を意識して取り付けしてください。 “Win Peace C” / For Tamiya Group C Cars The Tamiya Group C series has continued to be reissued since 2007. At first glance, the chassis structure may look simple. But inside that simplicity is a huge amount of character, history, and pure RC romance. I am one of the many people who have fallen deeply in love with these Group C cars. Because the chassis design remains essentially the same as it was when these cars were originally released, they have a depth and personality that is difficult to explain until you actually drive one. And now… We developed a part that fits into the base area of the standard wing stay on Tamiya Group C cars. The standard wing stay is made from a flexible resin that is difficult to break. That is a very good thing. But personally, I always felt it was just a little less rigid than I wanted. One of the great attractions of Tamiya Group C cars is that, despite keeping essentially the same basic shape for more than 30 years, they can still be driven hard and enjoyed on modern on-road circuits. But power systems have changed dramatically compared with the old days. Speeds are higher. And when speed increases, aerodynamic downforce also increases. I wanted to make just a little more use of that force. That is where this little guy comes in: Win Peace C BKWP-001 Development Concept As power systems have evolved, the speed of Group C cars has increased. And as speed rises, the amount of downforce generated by the wing also increases. I wanted to transmit that downforce to the chassis more efficiently. The original inspiration came from watching the wing move and shake during cornering. There were even times when I found myself backing off the throttle simply because the wing movement was bothering me. If I could reduce that movement, even just a little… And if the wing could accept and transfer just a little more of that downforce… That was the starting point for this product. Of course, it would also be possible to manufacture the entire wing stay from sheet metal. However, in the event of a major crash or rear impact, a fully rigid metal stay could potentially cause additional damage elsewhere. So instead, I wanted to create something more subtle. Something you simply slide into the standard wing stay… and then quietly smile to yourself. Mufufu. You may be thinking: “Couldn’t I just use some random shaft or rod instead?” Yes. Honestly, you probably could. But I started BAnkyRC because I wanted to communicate the beauty, precision, and functionality of sheet-metal parts. So I insisted on making this from sheet metal. I experimented with the shape again and again until I arrived at this design. And one more small detail: There is an M3 threaded hole on the bottom of the main body. If inspiration strikes and you think of another way to use it, please feel free to get creative. That is part of the fun. Easy Installation 1. Insert Win Peace C into the inside of the wing stay. The notched section should face toward the front of the car. 2. Insert the included spacers into the small holes on the left and right sides of the wing stay. The holes may have become slightly distorted over time, so try to push the spacers in as vertically and straight as possible. 3. Place the washers in position and secure everything using the included M3 truss-head screws. It may be easier to tighten the screws if you hold each screw against the wrench with your finger while starting the thread. Installation complete. Please tighten the left and right screws while making sure the Win Peace C main body is installed as horizontally as possible. Important Information Installing this product may change the behavior of the rear wing and chassis. Depending on your vehicle setup and driving style, you may need to make additional setup adjustments after installation. Installation Difficulty ★★★☆☆ Level 3 / 5 * It is easier to assemble if you insert the main Win Peace C body into the wing stay first. * Push the included spacers in as vertically as possible. * Do not forget to install the washers. * Please install the main body as level and horizontal as possible. For international shipping inquiries, please contact me directly through BASE messaging! Specifications Product Name: Win Peace C Product Code: BKWP-001 Material: Aluminum Thickness: 1.5 mm Quantity: 1 main unit Compatible Models: Tamiya Group C Cars using the standard wing stay Examples include: Sauber Mercedes C11, Mazda 787B, and other compatible Tamiya Group C models Included Parts: * 2 × M3 truss-head screws * 2 × M3 washers * 2 × 1.5 mm spacers Shipping in Japan: Click Post ¥250 Product Notes Because this is a sheet-metal component, minor scratches or processing marks may be present on the product surface as a result of manufacturing. These marks do not affect product performance or functionality. The included spacers should be pushed in as vertically as possible. Caution The product is made from aluminum. Applying excessive force may bend or deform the part. The threaded sections are also aluminum. Over-tightening the screws may damage or strip the threads. Please tighten carefully. For best performance, install the Win Peace C main body as horizontally and level as possible.
MORE -

ハードフロントダンパーステイ /アバンテ用
¥3,300($20.94)
タミヤRCシリーズで、レース参戦への為に開発されたアバンテは 滝博士とTRFの結晶であり伝説のRCです。 それゆえに、最も歴史的で芸術的なRC。 2011年より改良されて復刻。 このフォルムをそのままに、現在の3Dオフロードコースを 限界まで走れる商品が この、ハードフロントダンパーステイです。 :開発コンセプト: アバンテのフォルムをそのままに、ダンパーステイを強化したい。 フラットダート向きな純正の金Fショートダンパーで 走るから「アバンテ」なんだ。 そんな、声が降ってきたのが開発のスタートでした。 現行の3Dコースを標準のまま走らせると、ねじのゆるみや破損、 または、強制的なアンダーが出てしまうことが多いと感じます。 しかし、このハードフロントダンパーステイを装着することで ①部品破損の低減 ②フロント回りのねじのゆるみ低減 ③グリップ力の確保 さらに、ボディの脱着も楽になるダンパーステイです。 →板金カットの限界まで挑戦しました。 (BKH-AVA1) タミヤ アバンテ・アバンテ2011・アバンテブラック用。 (キット付属のダンパーが使用できます) (ダブルピロボールに1mmのスペーサーを2枚追加して付属の薄ナットで固定します) 組み立て難易度は★★★★★(レベル5です) ※装着用にビス及びスペーサー等は同梱しております。 ※フランジナット等をご使用の際はバンパー側でナットを取付ください。 ※ダンパーステイを固定する際のボルト挿入位置は任意となります。 ※ For international shipping inquiries, please contact me directly through BASE messaging! 材 質:SUS304 板 厚:2.5t 寸 法:60mm×40mm 内容物:ハードフロントダンパーステイ 対 応:タミヤアバンテ、アバンテ2011、ブラック (アバンテ2001、VQS、イグレスは後記あり) 付属品:①M3x14トラスビスx2、②M3x15トラスビスx2 ③3mmスペーサー×4、④1mmスペーサー×2 ⑤M3ナット×4、 ⑥スプリングワッシャ×2 簡易説明書(上記番号を参考にしてください) 発 送:クリックポスト250円 仕 様:板金部品には製品面に加工上傷が入ることがあります。製品上問題はありません。 仕 様:対象シャーシへの取付は付属のネジをご利用下さい。 備 考:アバンテ2001、VQS、イグレスは、ダンパーステイにボディポストがあるので、 既存部品の追加工やボディ固定方法の変更が必要になります。 取り付けに関しては、自己責任のDIYとなります。 :商品搭載写真は開発中の物も含まれます。使用パーツの差異がある場合があります。
MORE -


ハードフロントロングダンパーステイ /アバンテ用
¥4,400($27.92)
タミヤRCシリーズで、レース参戦への為に開発されたアバンテは 滝博士とTRFの結晶であり伝説のRCです。 それゆえに、最も歴史的で芸術的なRC。 2011年より改良されて復刻。 アイデンティティはそのままに、 各部をブラッシュアップしその良さを活かす 「アバンテ」の ハードフロントロングダンパーステイです。 (※フロントのダンパーを通常バギーF用に換装できるステイです) :開発コンセプト: アバンテを現在のサーキットで自在に走らせる 【蒼い彗星】 にしたい。 がコンセプトです。 フラットダート向きな純正の金Fショートダンパー設計から 現行の3Dサーキットコースを自在に壊すことなく走らせる。 ダンパー長65~75mmをフロントに装着することで ①フロントダンパーの容量UP ②Fアーム運動を阻害しない高さと角度の確保 ③リバウンドの確保 上記の効果により、グリップ力の向上、故障軽減、 さらに、ボディの脱着も楽になるダンパーステイです。 (BKHL-AVA1) タミヤ アバンテ・アバンテ2011・アバンテブラック用。 (65~75mm程度のロングダンパーが装着できるようになります) (CVA、DF-03用、エアレーション、GF-01用OPアルミダンパー等が使用できます) ※ハイキャパシティダンパーを搭載されたい場合はシャフト交換などDIYが必要になります。 組み立て難易度は★★★★★(レベル5です) ※装着用にビス及びスペーサー等は同梱しておりますが、ダンパーの種類によっては 取付の工夫と追加スペーサ等が必要になる場合がございます。 :装着による確認される効果: ・通常のバギー用のフロントダンパーが装着加工になります。(ご準備ください) ・フロントアーム上下運動とダンパーピストン運動が適正化(円弧運動)の傾向となる。 ・リバウント量が増加するので、フロント部のアームやアクスルの破損低減。 ・ビス脱落・ゆるみの低減。←これがかなり厄介だと思います。 ・ジャンプ~着地時の暴れ抑制やスムーズな挙動により特にフロント部への負担低減。 ※ For international shipping inquiries, please contact me directly through BASE messaging! 材 質:SUS304 板 厚:2.5t 寸 法:80mm×50mm 内容物:ハードフロントロングダンパーステイ 対 応:タミヤアバンテ、アバンテ2011、ブラック (アバンテ2001、VQS、イグレスは後記あり) 付属品:①M3x14トラスビスx4、②M3x15トラスビスx2 ③3mmスペーサー×4、④1mmスペーサー×2 ⑤M3ナット×4、 ⑥M3用ワッシャ・スプリングワッシャ各×4、 簡易説明書(上記番号を参考にしてください) 発 送:クリックポスト 仕 様:板金部品には製品面に加工上傷が入ることがあります。製品上問題はありません。 仕 様:対象シャーシへの取付は付属のネジをご利用下さい。 備 考:アバンテ2001、VQS、イグレスは、ダンパーステイにボディポストがあるので、 既存部品の追加工やボディ固定方法の変更が必要になります。 取り付けに関しては、自己責任のDIYとなります。 注 意:商品搭載写真は開発中の物も含まれます。使用パーツの差異がある場合があります。
MORE -
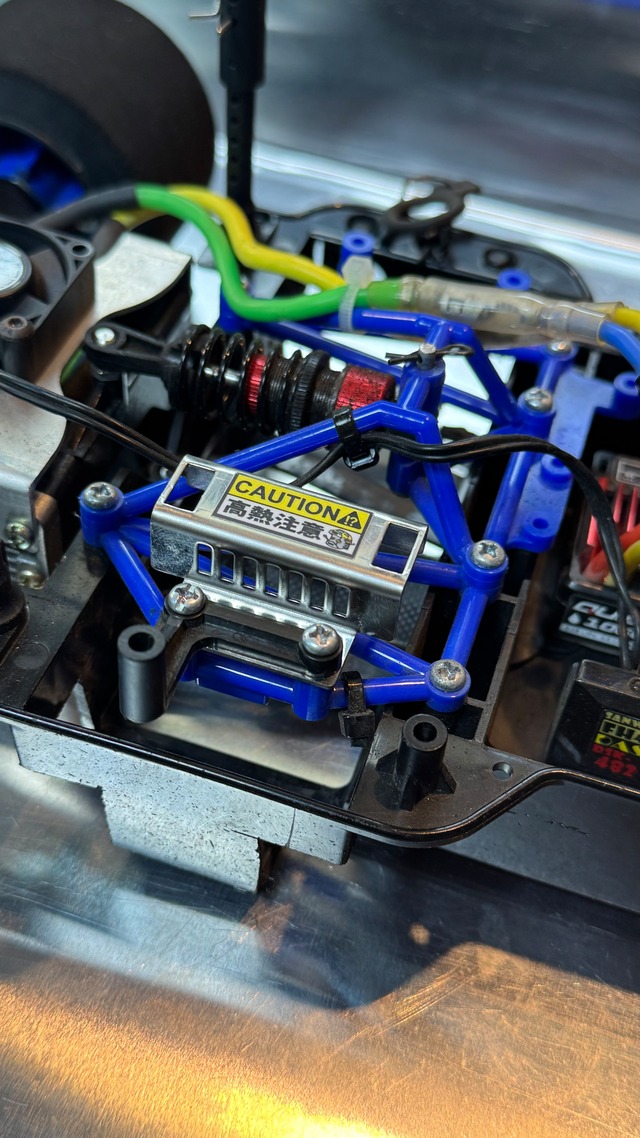
「カバドン」/セメント抵抗ダミーカバータミヤ用
¥1,540($9.77)
タミヤラジコン専用のセメント抵抗ダミーカバー(後期) 【カバドン】です。 昨今、続々と再版されたワクワクの詰まったタミヤRC達。 そのシャーシに、使用していない穴がありませんか? もしその穴が有れば、この【カバドン】を取り付けてあげてください。 きらっ!と輝くカバドン君がきっと、あなたのラジコンライフに プライスレスな気持ちとノスタルジーをプレゼントしてくれると思います。 ※カバドン君を装着する事で、走行性能は向上しません! しかし、愛着はさらに強くなると思います! ダミーカバー後期の形状を意識しているのがカバドン君です! :開発コンセプト: いつかは作らなければと思っていました。 いつか、BAnkyRCが作りたいと思い続けて2年! 貴方のシャーシに幸せの固定スペースが有れば使ってもらいたい。 そんな板金パーツ。 カバドンです! 無駄に、目立たせるためサスで作成しております! ※ For international shipping inquiries, please contact me directly through BASE messaging! (BKKDN1) 組み立て難易度は★⭐︎☆☆☆(レベル1です) 本体の固定にはM3のタッピングネジもしくはその他ネジをご用意下さい。 材 質:SUS304 板 厚:0.8t 研磨材 寸 法:26mm×38mm×12mm 内容物:カバドン本体 対 応:グラスホッパー、グラスホッパーⅡ、スーパーセイバー、ブーメラン、ランチボックス、サンダーショット、 (スーパー)クラッドバスター、Cカー、等、 日々確認更新中です。 ※セメント抵抗固定穴があるシャーシ全てに搭載できるかは寸法の確認が必要です。 日々情報確認中していきます! 付属品:特別ステッカー(高熱注意?!) 発 送:クリックポスト250円 仕 様:板金部品には製品面に加工上傷が入ることがあります。製品上問題はありません。 仕 様: :数量限定販売商品です。
MORE