




-


「リアコテヨ」/ タミヤ クラバス・ブルヘッド用 リアロックプレート
¥1,650($10.52)
:開発コンセプト: 1サーボで、フロントとリアを同時に動かす。 タミヤRC始まって以来の最大・最重量ヘビー級のRCは サーキットも自在に走り、悪路も走り回れる 唯一無二のRCです。 ただ、その1サーボでリアまで動かすと、 小回りが効きすぎることもあり、転んでしまったり タイヤも大きいため、サーボギアへの負荷低減を加味したリンケージ機構でも サーボの故障も否めない経験があります。 なので、商品写真内にある様にリアを固定していましたが 不安があり、新しく作りました。 それが、リアコテヨです! 取付穴ピッチは、標準のピッチにできる限り寄せました。 軽量で衝撃にできる限り耐えうる、アルミの3mmを設定しました。 標準バンパー内に収まるので隠れおしゃれにも?! (BKRY-001) 取付難易度は★★☆☆☆レベル2です。 ※ ※ For international shipping inquiries, please contact me directly through BASE messaging! 材 質:アルミ 板 厚:3.0t 個 数:1ケ 対 応:タミヤクラッドバスター・ブルヘッド 付属品:本体、トラスねじ×2、ワッシャ×2、フランジ付きナット×2 発 送:クリックポスト350円 仕 様:板金部品には製品面に加工上傷が入ることがあります。製品上問題はありません。 注 意:素材はアルミです過度に力を加えると変形します。 注 意:本体は極力水平を意識して取り付けしてください。
MORE -


「ブラミィ」(Blamy)/ スイッチブラケット
¥1,250($7.97)
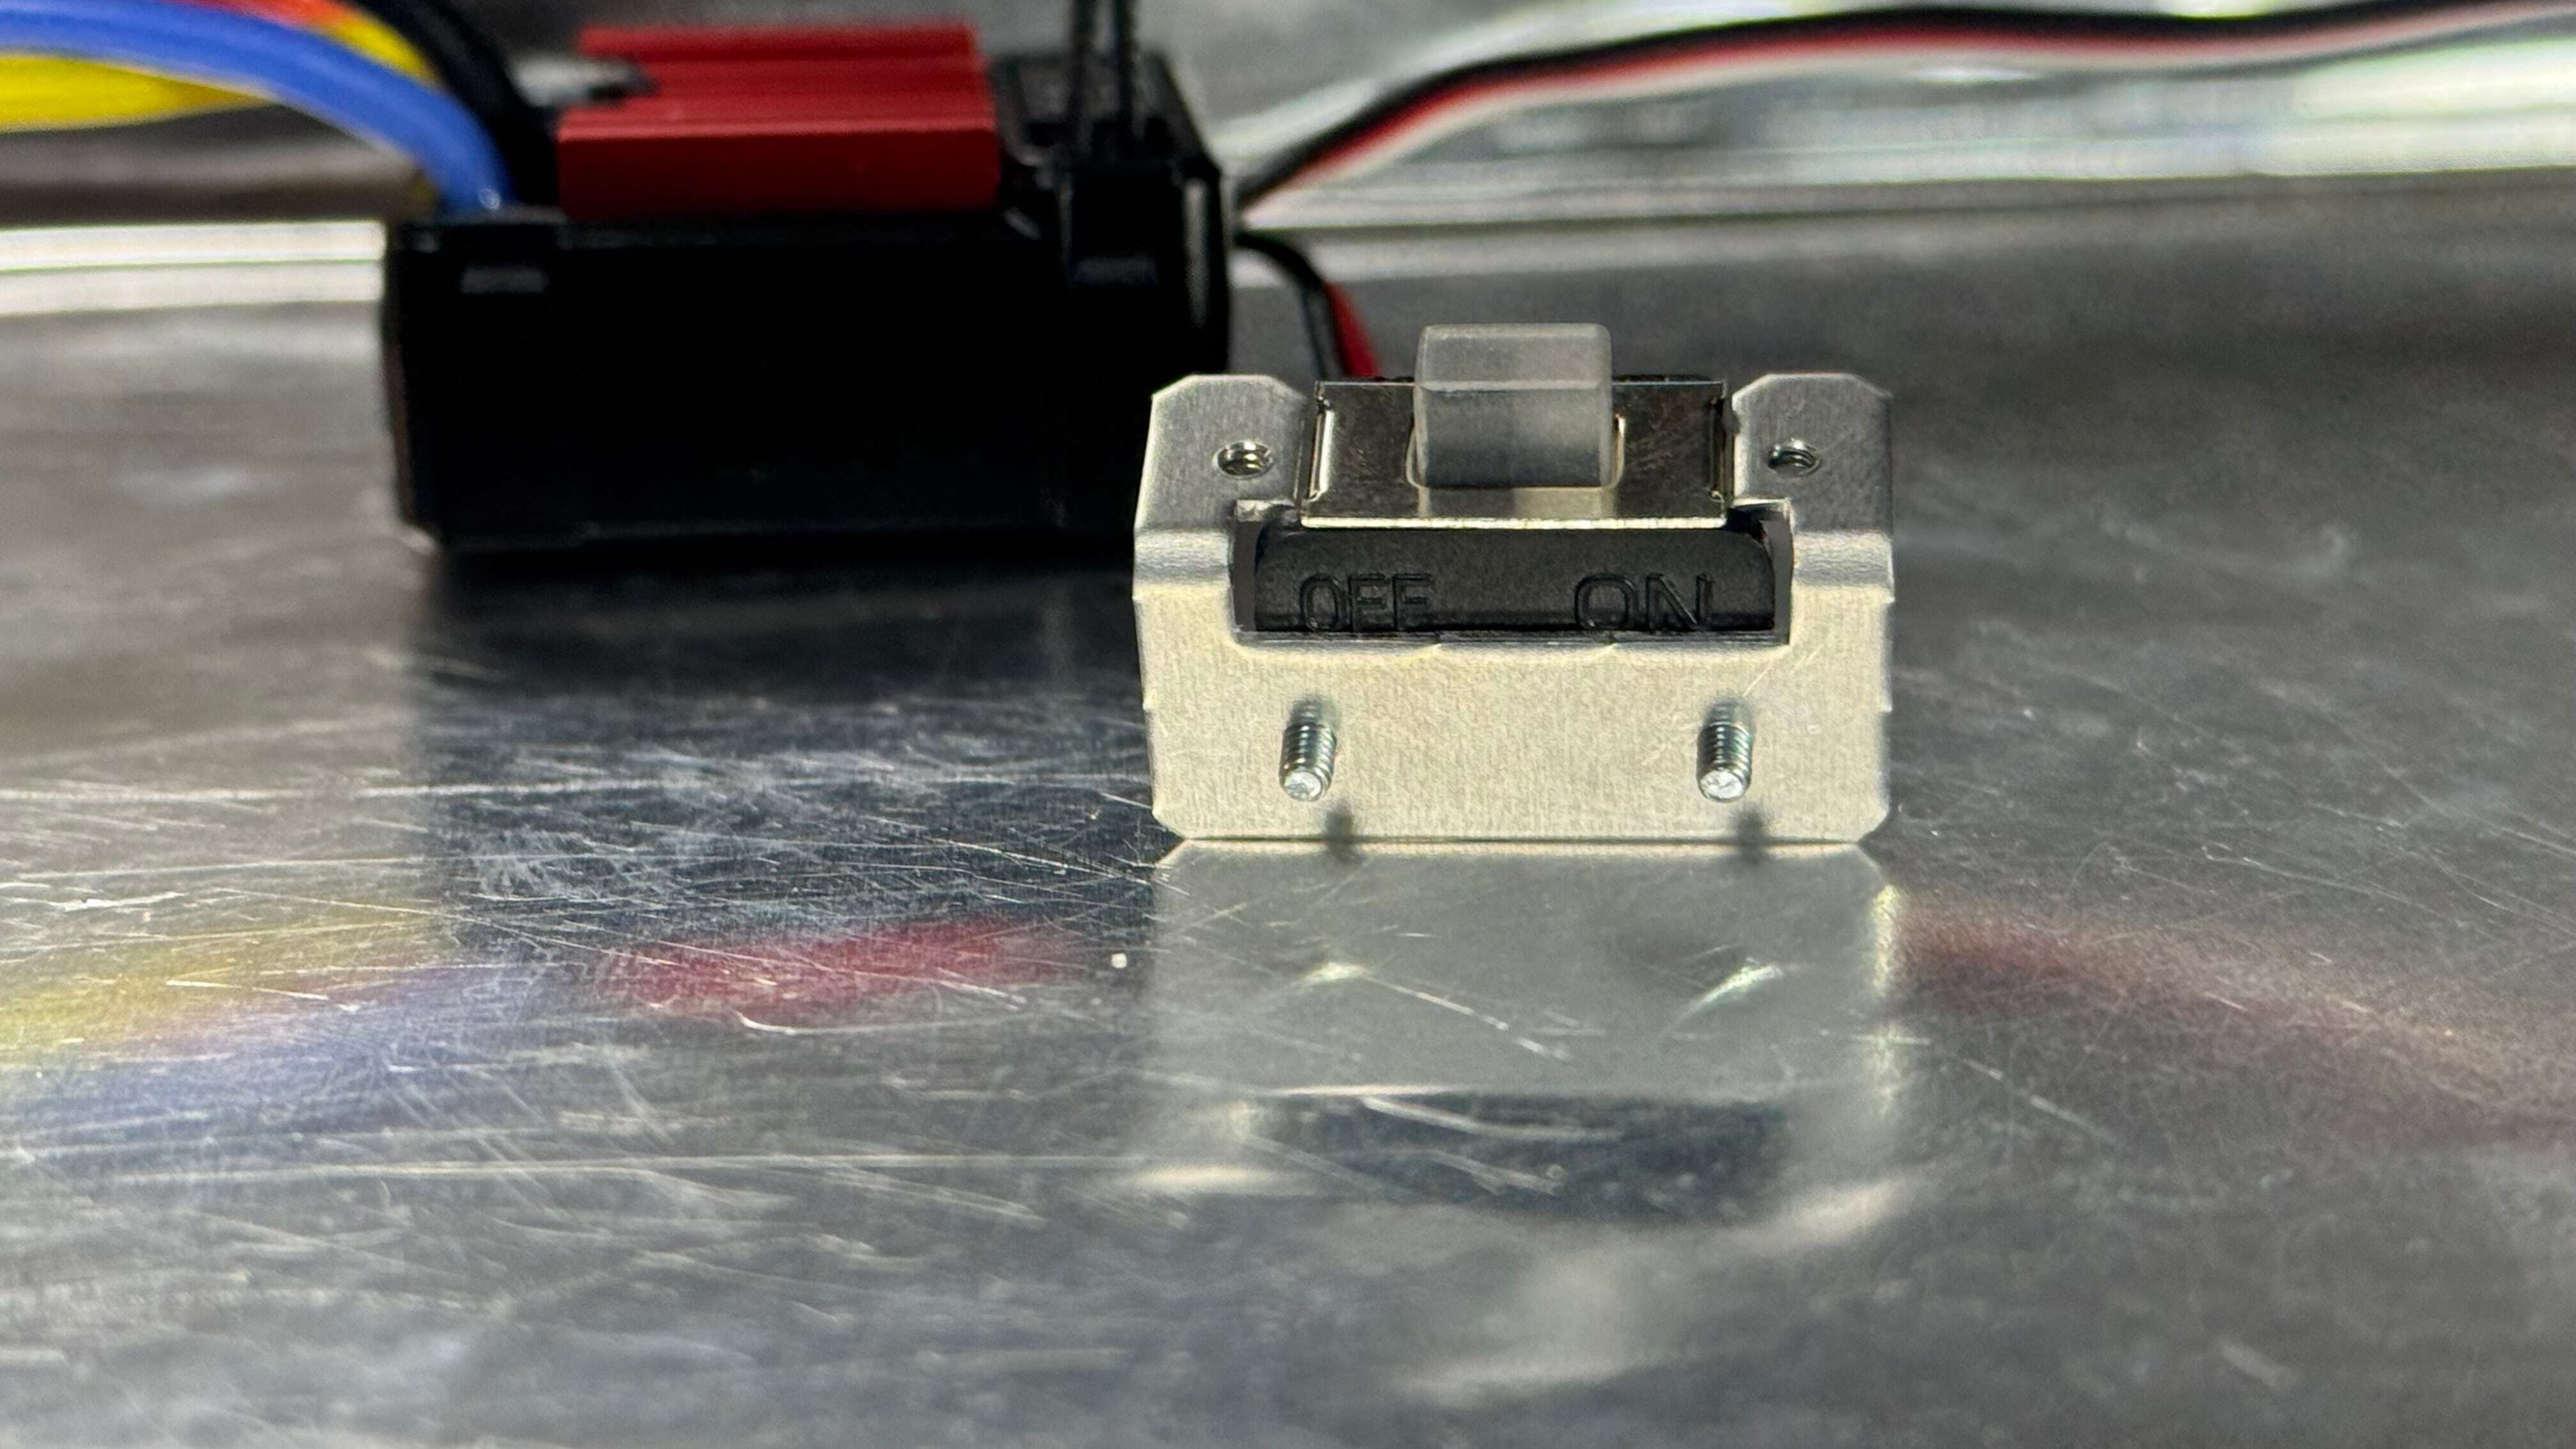
ホビーウイングさんの1060のESCを タミヤRCキットの標準位置で使用できるパーツてす。 (BKBM-001) より手軽に使えるホビーウイングさんの1060のESC。 現在はOEMで同じ形状のESCが各メーカー様から発売されています。 このESCのスイッチ位置は、ESC本体の爪に固定するのが標準ですが タミヤRCの取扱説明書標準位置で固定できる様になるのが? この子「ブラミィ」です。 付属のM2のなべねじで、ESCのスイッチをブラミーに固定してから タミヤシャーシのスイッチ部M2のトラスネジで固定してください。 〜ブラミィの特徴〜 ・切り欠き部分からスイッチのON/OFFが確認できます。 →RCの進行方向にON側を向けて取り付けてください。 取説と同様の固定方法です。 ・固定面とスイッチ面には緩み対策として一定のクリアランスを設けています。 →締め付けすぎにご注意下さい。 OEMのスイッチには爪がついているものがありますので 取り外してから位置の確認をしてください。(WP-1060等) ブラミーはスイッチ面が、シャーシ内側の面に直接あてがわれるので スイッチの入り切り操作のストレスが低減します。 シャーシのレイアウトによっては、ESCの固定方法に工夫が必要になります。 ご確認ください。 取付難易度は★★⭐︎☆☆レベル2です。 ※スイッチ取付位置に合わせて、ESCの位置を変更する場合があります。 ※ネジが小さいので落下紛失にご注意ください。 ※ネジが小さいので締め付けすぎにご注意ください。 ※ For international shipping inquiries, please contact me directly through BASE messaging! 材 質:アルミ 板 厚:1t 個 数:1ケ 対 応:タミヤシャーシグラホⅠ・Ⅱ、DT02・03・04、ランチボ系、TT01・02、 ※CC01・02、M05、BBX、モンスタービートル、MB-01、BBX、ファイターネクシュジェン Cカー、等、 対応シャーシは日々更新しています。 日々対応機種確認中~ 付属品:各種M2ねじ(なべネジ×2(スイッチ固定用)、トラスねじ×2(ブラミー固定用)) 発 送:クリックポスト350円 仕 様:板金部品には製品面に加工上傷が入ることがあります。製品上問題はありません。 仕 様:スイッチ取付位置に合わせて、ESCの位置を変更する場合があります。 注 意:素材はアルミです過度に力を加えると変形します。 注 意:素材はアルミです過度に締め付けるとタップが壊れます。 注 意:取り付け方向でブラミィ固定ネジが干渉する場合があります。スペーサー等をご用意下さい。 “Blamy” / ESC Switch Bracket Blamy is a switch bracket designed to allow the Hobbywing 1060 ESC to use the standard switch mounting position specified in Tamiya RC kit instructions. Product Code: BKBM-001 The Hobbywing 1060 is a simple, affordable, and widely used ESC. Today, ESCs with the same basic shape are also available from various manufacturers as OEM products. Normally, the power switch for this type of ESC is clipped directly onto the ESC body. But what if you want to mount that switch neatly in the standard switch position shown in a Tamiya instruction manual? That is exactly what this little guy is for. Blamy. Installation First, secure the ESC power switch to Blamy using the included M2 pan-head screws. Then mount Blamy to the Tamiya chassis using the M2 truss-head screws at the standard switch mounting position. Features of Blamy Easy ON/OFF Identification The cutout in Blamy allows you to visually confirm the ON/OFF position of the switch. Install the switch so that the ON side faces toward the front of the RC car. This follows the same basic orientation used in Tamiya instruction manuals. Designed-In Clearance A small amount of clearance is intentionally provided between the mounting surface and the switch surface. This helps reduce the risk of loosening and allows the switch to sit securely. Please be careful not to over-tighten the screws. Compatibility with OEM-Type Switches Some OEM versions of this ESC use switches with small mounting tabs or claws. For models such as the WP-1060, these tabs may need to be removed before checking the correct mounting position. Please confirm the switch shape before installation. Reduced Stress During Switch Operation With Blamy installed, the switch surface is supported directly against the inner surface of the chassis. This helps reduce movement and stress when turning the power switch ON and OFF. It also gives the switch a more solid and natural operating feel. ESC Position Depending on the chassis layout, you may need to adjust or reconsider the mounting position of the ESC itself. Please confirm the available space and cable routing on your chassis before final installation. Installation Difficulty ★★☆☆☆ Level 2 / 5 * The ESC position may need to be changed depending on the switch mounting location. * The included screws are very small, so please take care not to drop or lose them. * Because the screws are small, please be careful not to over-tighten them. For international shipping inquiries, please contact me directly through BASE messaging! Specifications Product Name: Blamy Product Code: BKBM-001 Material: Aluminum Thickness: 1.0 mm Quantity: 1 bracket Compatible ESC Type: Hobbywing 1060 and compatible OEM-type ESC switches with the same basic shape Compatible Tamiya Chassis: Confirmed or currently being checked for use with: * Grasshopper I / II * DT-02 * DT-03 * DT-04 * Lunch Box series * TT-01 * TT-02 * CC-01 * CC-02 * M-05 * BBX * Monster Beetle * MB-01 * Fighter NXGEN * Tamiya Group C Cars * and other compatible chassis Compatible chassis are being tested and updated continuously. Included Hardware * 2 × M2 pan-head screws for securing the ESC switch * 2 × M2 truss-head screws for securing Blamy to the chassis Shipping in Japan: Click Post ¥250 Product Notes Because this is a sheet-metal component, minor scratches or processing marks may be present on the product surface as a result of manufacturing. These marks do not affect product performance or functionality. Depending on the switch mounting position, the ESC mounting location may need to be adjusted. Caution Blamy is made from aluminum. Applying excessive force may bend or deform the bracket. The threaded sections are also aluminum. Over-tightening the screws may damage or strip the threads. Depending on the installation direction and chassis layout, the Blamy mounting screws may interfere with surrounding parts. If necessary, please prepare suitable spacers or other adjustment parts to create sufficient clearance.
MORE -

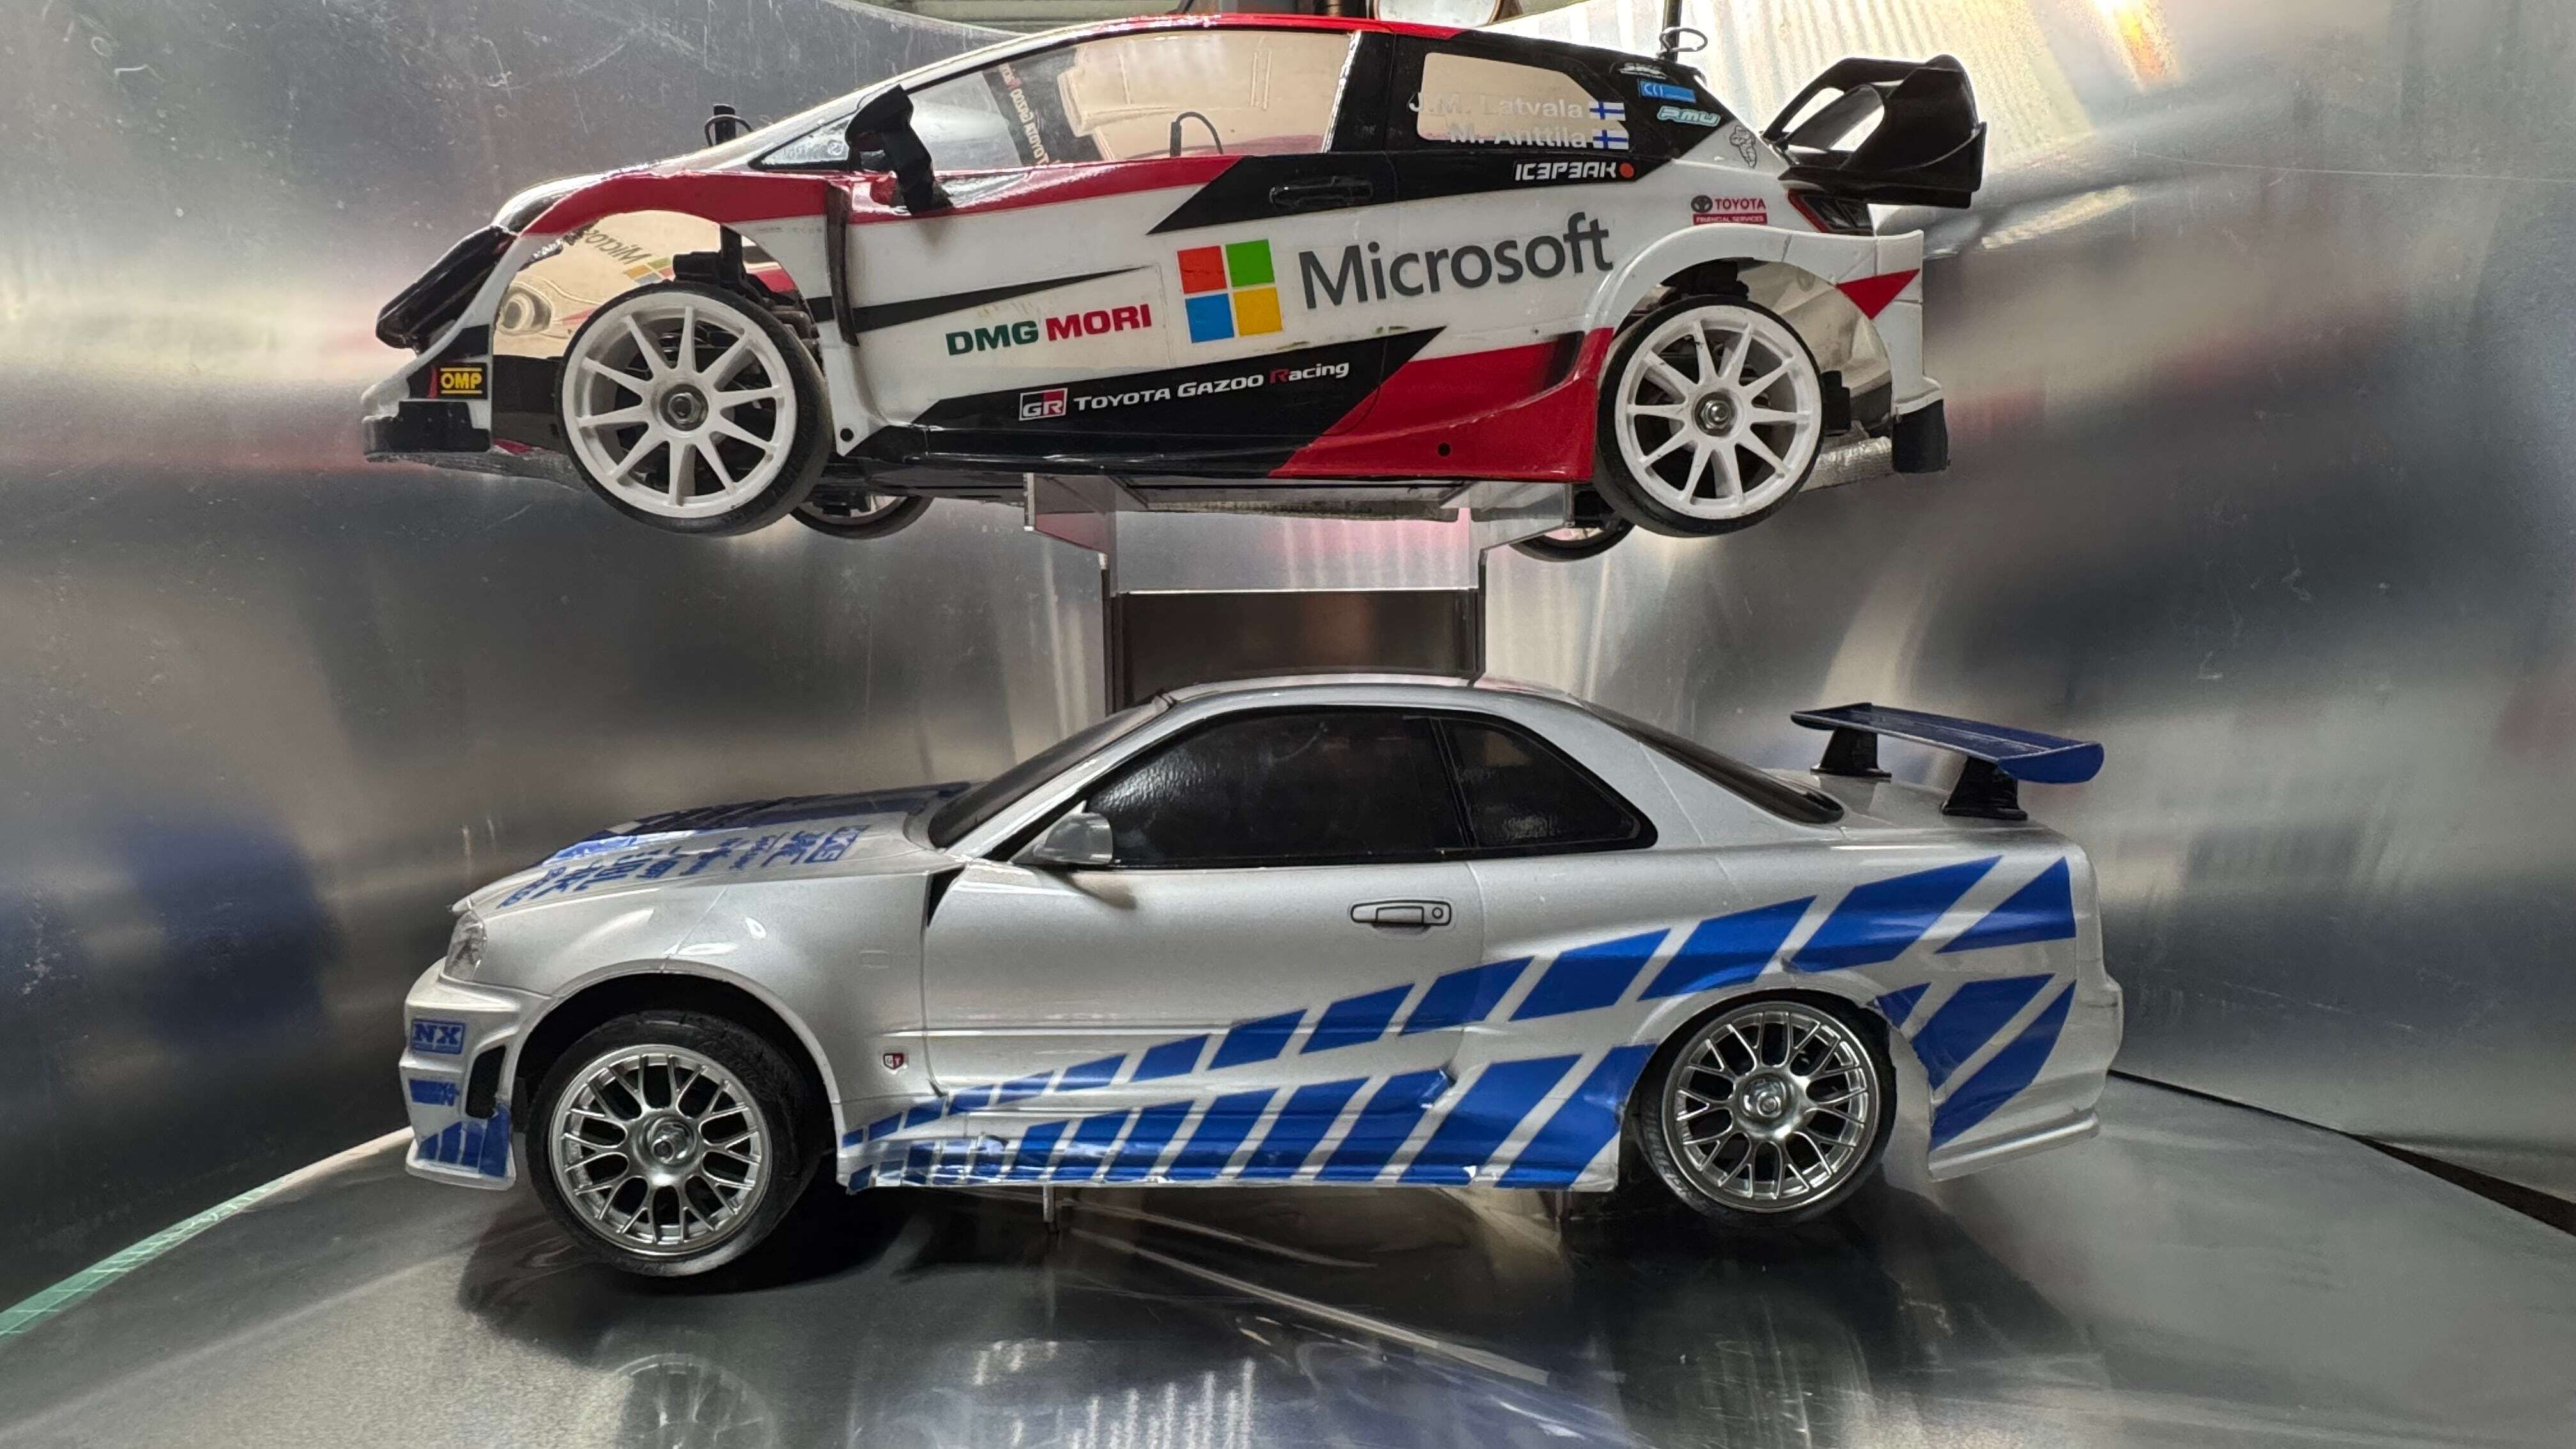
「デュアルスタンドゥ」/ デュアルRC用スタンド【Dual Standu / Dual RC Stand】
¥4,840($30.85)
:開発コンセプト: クラッドバスターのRCスタンドほしいなぁ。 と、ぼんやり考えていました。ずっと。 でも、それだけじゃつまらないなぁとも思っておりました。 そして、ふと増車するRCの置き場が狭くなってきていることに気が付いて クラバスも置けて、その他のRCも置けるスタンドがほしい! 縦方向に置けば場所問題が解決する! が、コンセプトです。 もちろん、クラバスを置くときは1台のみですが クラバス以外でもご利用できます。 そして、ピットへの持ち込みは少しかさばりますが、 連れて行ってもらえるとうれしいです。 板厚は、妥協なしの3mmです。 写真以上に頑丈なつくりになっています。 (BKDS-001) ~組み込みは簡単~ ※保護フィルムがある場合はがしてご利用ください。 曲げ方向が内側になる様に、左右のプレートを確認して バックパネルと固定してください。 ※ For international shipping inquiries, please contact me directly through BASE messaging! 取付難易度は★★☆☆☆レベル2です。 材 質:アルミ 板 厚:3.0t 個 数:1式 (L/Rサイドパーツ、バックパネル) 付属品:M3-6トラスねじ×4 発 送:クリックポスト350円 仕 様:板金部品には製品面に加工上傷が入ることがあります。製品上問題はありません。 注 意:素材はアルミです過度に力を加えると変形します。 注 意:素材はアルミです過度に締め付けるとタップが壊れます。 注 意:写真に写る、RCシャーシは商品に含まれません。 Dual Standu / Dual RC Stand Product No.: BKDS-001 Development Concept For a long time, I had been casually thinking, "I'd really like to have an RC stand for my Tamiya Clod Buster." But at the same time, I thought, "Making a stand just for the Clod Buster would be a little boring." Then one day, I realized that my growing RC collection was starting to take up more and more space. That's when the idea came to me! I wanted a stand that could hold my Clod Buster AND my other RC cars! And if I could store RC cars vertically, I could solve the space problem, too! That became the concept behind the Dual Standu. Of course, when using it for the Clod Buster, the stand holds only one vehicle. But it's not just for the Clod Buster. You can also use it for other RC cars! It may be a little bulky to bring along to the RC pit, but I'd be really happy if you took it with you! And when it comes to strength, we made no compromises. The Dual Standu is made from 3.0 mm thick aluminum. It's even sturdier than it looks in the photos! That's the Dual Standu from BAnkyRC. Easy Assembly Assembly is simple! If protective film is applied to the parts, remove it before use. Check the left and right side plates, making sure the bends face inward. Secure both side plates to the back panel using the supplied screws. For international shipping inquiries, please contact me directly through BASE messaging! Product Specifications Installation Difficulty: ★★☆☆☆ (Level 2) Material: Aluminum Thickness: 3.0 mm Quantity: 1 complete set (Left and right side plates + back panel) Included Hardware: M3 × 6 mm truss head screws × 4 Domestic Shipping: Click Post — ¥350 Product Notes & Precautions Minor scratches may occur on the surface of sheet metal parts during manufacturing. These do not affect the product's functionality. The product is made of aluminum. Applying excessive force may cause deformation. Do not overtighten the screws, as excessive torque may damage the threaded holes in the aluminum. RC chassis and vehicles shown in the photos are for demonstration purposes only and are not included with the product.
MORE -
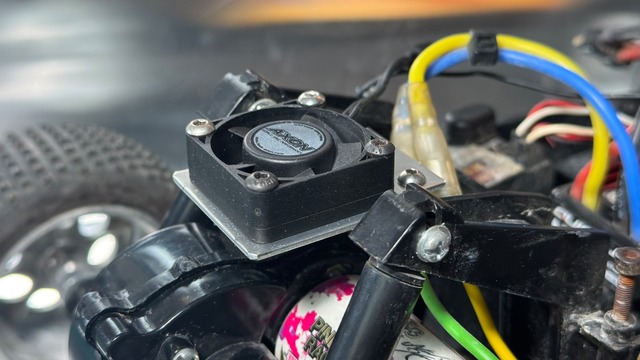
「ファンブゥ GⅠ」/ グラスホッパー・ホーネット専用ファンブラケット
¥1,210($7.71)
2026年で、タミヤ グラスホッパーは販売から42年。 ロングセラーラジコンの内の1台です。 カラーバリエーションも多く存在し、複数台所有されている方が多いでしょう。 380モーター標準搭載。走りはまさに飛蝗のような走り。 いじり甲斐があるラジコンでもありますね。 そして、何台持っていてもいいラジコンと思います。 そんな、グラスホッパーにモーターを冷やしつつ プラスチックボディのいいアクセントになる商品を作りました。 2026/10/18 ホーネットを組み立て、 ホーネットにも使用できる事が判明しました。 ホーネットユーザー様もご使用できます! 「ファンブゥGⅠ」です。 (BKFG-001) :開発コンセプト: グラホのリアが少し寂しい。 ここに、プレートをいれて、、 おお! なんか、ファンが見えててかっこいいぞ! これは、商品化して皆さんに使ってもらいたい! そして、価格も抑えめに! が、コンセプトです。 既に、DIYでつけている方も多いと思いますが、 ポン付けできる、ファンブゥGⅠは如何ですか? そっと取り付けて、ムフフ。としてもらいたいです。 ※保護フィルムをはがしてご利用ください。 ※写真のファン本体は付属しません。 ※30ファンサイズ用です。 取付難易度は★☆☆☆☆レベル1です。 材 質:アルミ 板 厚:1.5t 個 数:1ケ 対 応:タミヤグラスホッパー専用 付属品:M3トラスねじ×2 発 送:クリックポスト350円 仕 様:板金部品には製品面に加工上傷が入ることがあります。製品上問題はありません。 注 意:素材はアルミです過度に力を加えると変形します。 注 意:素材はアルミです過度に締め付けるとタップが壊れます。 ※ For international shipping inquiries, please contact me directly through BASE messaging!
MORE -


「ファンブゥCC」/ タミヤ Cカー用 ファンブラケット
¥1,430($9.12)
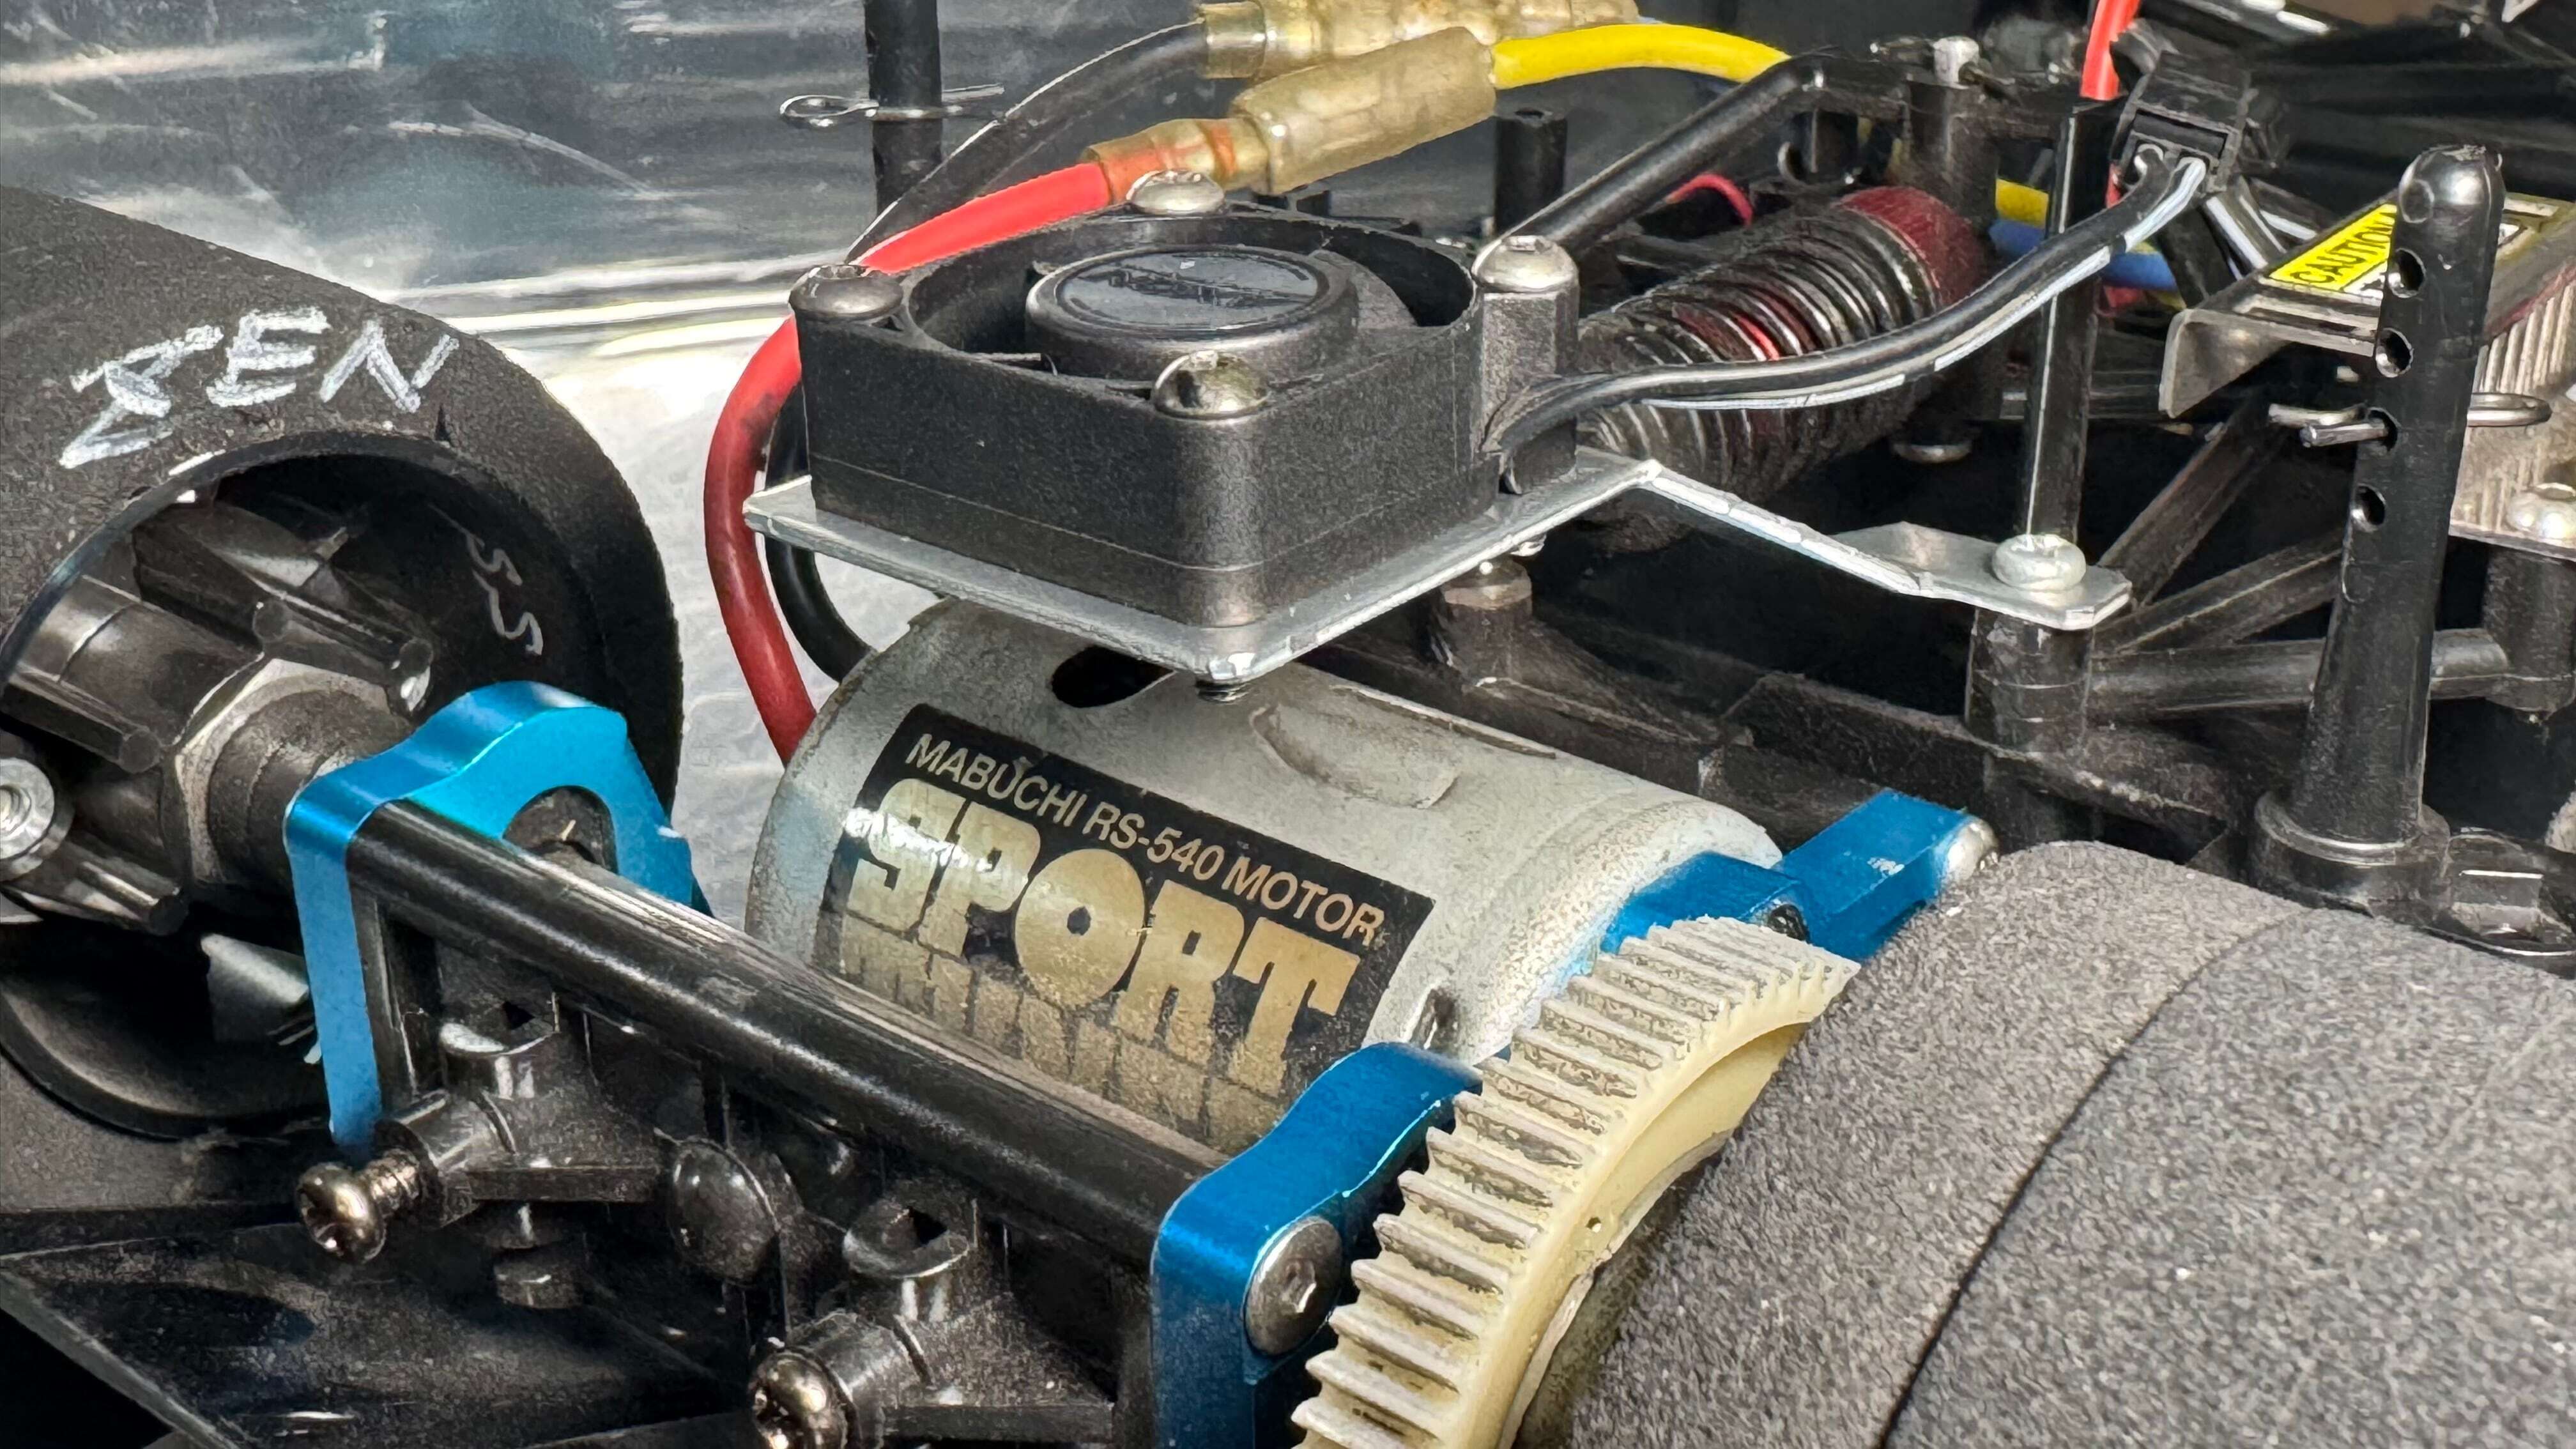
2007年より再販を続けている、タミヤCカーシリーズ 単純と思われるシャーシ構造の中に、ロマンがたくさん詰まっているCカー。 その魅力にどっぷりとつかっている人のうちの一人でも私はあります。 販売当時とシャーシ構造が同じだからこそ、 奥が深く味わい深い1台ですよね。 「そんなCカーのモーターを、しっかりと冷やす!」 毎年毎年最高気温を更新する昨今です。 操縦者もRCも熱対策はしっかりとしたいですよね。 そんな時、この子「ファンブゥCC」がぴったりです! (BKCC-001) :開発コンセプト: パワーソースが変化し、ブラシレスモーターが多く採用されて ブラシドモーターと比較して走行時のモーター温度は低くなっていると思いますいが、 上昇し続ける外気温。 それに比例する路面温度の上昇。 人もRCも大変な夏場を乗り切るには、ファンブラケットを作らねば! が、開発コンセプトの一つです。 ファンブラケットを固定するのに、ギアケースに共じめせず リアダンパー固定アーム(シャーシ側)に共じめ固定の設計にしております。 既存タッピングビス「MC4 M3×18」を使用して固定をして下さい。 冷却ファンは別途ご用意ください。 ファンの固定は、M3をご利用ください。 ユーザー様からのお情報を追記です!! KAWADA製 モーターマウント&チューブダンパー装着車に、 なんと! シンデレラフィットで御座いましたのでご報告させて頂きます。 取り付けはモーターマウントとダンパーステーの間にファンステーを挟んで取り付けるとシャーシロール時にも干渉無く取り付ける事が出来ます。 と、タレコミを頂きました! カワダユーザー様!この機会に是非とも! 取付難易度は★★☆☆☆レベル2です。 ※既存部品との穴位置を確認して固定してください。 ※ For international shipping inquiries, please contact me directly through BASE messaging! 材 質:アルミ 板 厚:1.5t 個 数:1ケ 対 応:タミヤCカーシャーシ TAMIYA Group C Car 付属品:本体 発 送:クリックポスト350円 仕 様:板金部品には製品面に加工上傷が入ることがあります。製品上問題はありません。 仕 様:ファンの固定ネジは優しく締めこんで下さい。 仕 様:WBでファンの位置は変更します。 注 意:素材はアルミです過度に力を加えると変形します。 注 意:素材はアルミです過度に締め付けるとタップが壊れます。 注 意:本体は極力水平を意識して取り付けしてください。 “FANBoo CC” / Cooling Fan Bracket for Tamiya Group C Cars The Tamiya Group C series has continued to be reissued since 2007. At first glance, the chassis structure may look simple. But inside that simplicity is a huge amount of character, history, and pure RC romance. I am also one of the many people who have completely fallen for the charm of these Group C cars. And because the basic chassis structure remains essentially the same as when these cars were originally released, they still have incredible depth and character even today. That is part of what makes them so special. So we thought: “Let’s cool that Group C motor properly!” These days, it feels like the highest summer temperatures are being broken year after year. Both the driver and the RC car need proper protection from the heat. And when things get hot, this little guy is ready to help: FANBoo CC BKCC-001 Development Concept Modern RC power systems have changed dramatically. Brushless motors are now widely used, and compared with brushed motors, operating temperatures may often be lower. But there is another problem: The outside temperature keeps rising. And as the air temperature rises, so does the track surface temperature. Summer is becoming tougher for both people and RC cars. So one of the ideas behind this product was very simple: “If we want to survive those hot summer RC sessions, we need a proper fan bracket!” That became one of the development concepts behind FANBoo CC. Rather than securing the fan bracket together with the gearbox, FANBoo CC is designed to mount together with the rear damper mounting arm on the chassis side. Please use the existing Tamiya tapping screw: MC4 M3 × 18 mm to secure the bracket. The cooling fan itself is sold separately and must be prepared by the user. Please use M3 screws to attach your cooling fan to FANBoo CC. Compatibility Information from a User! We received some very useful information from one of our customers. And this one made us very happy. A Tamiya Group C car equipped with a: KAWADA motor mount and tube damper setup turned out to be an almost perfect fit! A true Cinderella fit. According to the user, FANBoo CC can be installed by positioning the fan bracket between the motor mount and the damper stay. With this installation method, the bracket can be mounted without interference even when the chassis rolls during driving. That was the information we received directly from the user. So, KAWADA users… This may be a very nice opportunity to add FANBoo CC to your machine! Installation Difficulty ★★☆☆☆ Level 2 / 5 Installation is relatively simple. Please confirm that the mounting holes align correctly with the existing parts before tightening everything into place. For international shipping inquiries, please contact me directly through BASE messaging! Specifications Product Name: FANBoo CC Product Code: BKCC-001 Material: Aluminum Thickness: 1.5 mm Quantity: 1 bracket Compatible Chassis: Tamiya Group C Car chassis Included Parts: FANBoo CC main bracket only Shipping in Japan: Click Post ¥250 Product Notes Because this is a sheet-metal component, minor scratches or processing marks may be present on the product surface as a result of manufacturing. These marks do not affect product performance or functionality. Please tighten the fan mounting screws gently. The cooling fan position may need to be changed depending on the vehicle’s wheelbase (WB). Caution The product is made from aluminum. Applying excessive force may bend or deform the bracket. The threaded sections are also aluminum. Over-tightening the screws may damage or strip the threads. Please tighten carefully. For best installation, mount the FANBoo CC body as horizontally and level as possible. The cooling fan shown in any example installation photos is not included unless specifically stated otherwise.
MORE -

【記憶と体験を未来へつなぐ】アクキー/【Acrylic Keychain】
¥880($5.61)
私のRC活動の想いを形にしたアクリルキーホルダーです。 気に入ったら買ってやって下さい。 以前にSNSに投稿した内容に近いですが、 【記憶と体験を未来へつなぐ】 RC業界の未来を真剣に自分なりに考えた結果。 「RCカーに触れてもらえる時間と場所を作る」 でした。 ではその未来は何か? それは、子供たち。 そしてRCに触れた記憶と体験。 それが、ラジコンの未来と信じて止まない私。 そんな私、ラジコンが大好きです。 ただずっと、RCを触り続ける人生はごく一部の人たちだと思います。 となると、分母はかなり少なくなります。 ただ、その人たちによって技術は進歩します。 でも、進歩する技術には投資が必要です。 その為には、マーケットが必要です・・・ この辺りは、専門の人たちにお任せしますがwww 私なりに考えた、この業界に返せるものはないか?? それは、記憶と体験の場を作ること。 これが、私の活動の根幹です。 例えば、野球やサッカー。 見るのと、やるのではまったく違います。 全然やらない人と、少しでもやった人とも差が出ます。 では、ラジコンは? やはり全然違います。 初めて操縦したその刹那! 感動と興奮を同時に与えてくれます。 なんと素晴らしいのでしょう! この記憶と体験を一人でも多くの子に! が、私の純情という熱情です。 自分がそうだっと様に、 大人になったらきっと「思い出します」 小さな時の「記憶」と「体験」が そして、 RCサッカーの試合には、PKがあります。 このPKなんですが。 まっすぐ走るラジコンがあれば、 プロポさえ握れれば、シュートを決められます! 野外のイベントで親御さんの声を生で聞いたり お話し頂いたりします。 「ラジコンは難しいから、、」 「まだ、〇〇君には早いから」 と、 そして、手を引かれてその場を去るちびっ子。 でも、ラジコンカーでするPKは? 「誰でも出来ちゃんうです!!」 プロポさえ握れればいいんです! ゴールしたら、うまい棒たくさんもらえちゃうんです! その時の子供の笑顔やにやにや顔ww それを見る、親御さん。 ここプライスレス空間です。 それを、見るたびに私は幸せです。 それでも、私も人間なので色々と挫けそうな時はw 【我武者羅】と言い聞かせてますがw そう、私ができることはたかが知れてます。 ただ、一人でも多くの人の記憶と体験になれば 悔いなしです! 2025年お声をかけてもらって参加した富士スピードウェイの フューエルフェスト2025。 ラジコン体験したちびっ子は141人 2026年も開催しました。 このイベントでのちびっ子達は記憶が強く残っています。 だって、、、 ラジコンを色や形で選ばなかったからw 「S13はない?」 「ラジコンでダッジないの?」 「FD3Sはないの?」 な感じwww 今年も気合入れて、ボディ作って行かないとですw こんな、私ですが ここでPKやりに来ない? サッカーでイベントしない? と、声をかけていただける機会が増えており非常にありがたいことです。 本当にありがとうございます。 私の純情へのご支援やご協賛に遠慮はしませんので いつでもウェルカムですw 今後とも、変態おじさんダニエルRCを よろしくお願いします。 Connecting Memories and Experiences to the Future — Acrylic Keychain This acrylic keychain represents the passion and philosophy behind my RC activities. If you like it, I'd be really happy if you bought one! What I'm about to share is similar to something I previously posted on social media. Connecting Memories and Experiences to the Future After seriously thinking about the future of the RC industry in my own way, I came to one conclusion: "Create opportunities, times, and places where people can experience RC cars firsthand." So, what does that future look like? To me, it's the children. And the memories and experiences they gain from RC cars. I firmly believe that those memories and experiences are the future of our hobby. And me? I absolutely love RC cars! Of course, I realize that only a small percentage of people will continue enjoying RC cars throughout their entire lives. That means the number of lifelong enthusiasts is relatively small. Those dedicated enthusiasts help drive technological progress. But technological progress requires investment. And investment requires a market... Well, I'll leave that part to the industry experts! LOL Instead, I started asking myself: "What can I personally give back to the RC community?" My answer was simple. Create places where people can make memories and gain experiences. That is the foundation of everything I do. Think about baseball or soccer, for example. Watching a sport and actually playing it are completely different experiences. Even someone who has only played a little sees things differently from someone who has never tried it. So, what about RC cars? It's exactly the same! That very first moment when you take control of an RC car! You feel excitement and amazement at the same time. Isn't that wonderful? I want as many children as possible to experience that moment and carry those memories with them. That is the pure-hearted passion that drives me. Because I believe that, just as I do, when those children grow up, they'll remember. The memories and experiences of their childhood. The Magic of RC Soccer And here's another thing. Our RC soccer matches include penalty kicks! The wonderful thing about these penalty kicks is that if an RC car can drive straight, and you can hold a transmitter, you can score a goal! At outdoor events, I often hear parents saying things like: "RC cars are too difficult..." "My little boy is still too young for that..." And then I see the child being led away by the hand. But what about taking a penalty kick with an RC car? Anyone can do it!! All you need to do is hold the transmitter! And if you score a goal, you get lots of Umaibo snacks as a prize! The smiles on the children's faces, and those cheeky little grins! LOL And the parents watching their children having so much fun. Those moments are absolutely priceless. Every time I see them, they make me happy. Of course, I'm only human. Sometimes I get discouraged, too. LOL When that happens, I remind myself of one word: GAMUSHARA (我武者羅) — Give it everything you've got, with all your heart! Yes, I know there's only so much one person can do. But if I can become part of the memories and experiences of even one more person, I'll have no regrets! Memories from FuelFest at Fuji Speedway In 2025, I was invited to participate in FuelFest 2025 at Fuji Speedway. 141 children experienced RC cars at that event. We held the event again in 2026. The children from these events have left particularly strong memories with me. And there's a funny reason for that... They didn't choose their RC cars simply by color or shape! LOL Instead, they were asking things like: "Don't you have an S13?" "Is there a Dodge RC car?" "Don't you have an FD3S?" Seriously! LOL Looks like I'll have to put even more effort into preparing some awesome RC car bodies for the next event! Looking Toward the Future These days, I'm very grateful that more and more people are reaching out to me with invitations like: "Would you like to come and run an RC penalty kick event here?" "How about organizing an RC soccer event together?" I truly appreciate every opportunity. Thank you so much! And by the way... I'm never too shy to accept support or sponsorship for this pure-hearted passion of mine! You're always welcome! LOL Thank you for continuing to support this crazy, RC-obsessed old guy, Daniel RC! Let's keep connecting memories and experiences to the future. Daniel RC
MORE -

「ウィンピースC」(Win Peace C)/ タミヤ Cカー用
¥1,320($8.41)
2007年より再販を続けている、タミヤCカーシリーズ 単純と思われるシャーシ構造の中に、ロマンがたくさん詰まっているCカー。 その魅力にどっぷりとつかっている人のうちの一人でも私はあります。 販売当時とシャーシ構造が同じだからこそ、 奥が深く味わい深い1台。 「そんなCカーのウイングステイ根元に取り付けられる商品を開発しました。」 標準のウイングステイは、折れにくい樹脂を使用しています。 が、すこーしだけ頼りなく感じておりました。 Cカーの魅力は、30年以上形を変えずに現代のオンロードサーキットでも ぐんぐん遊べる一台です。 しかし、パワーソースも昔とは格段に変化した今。 ダウンフォースをもう少しだけ、力に変えたい。 そんな時、この子「ウィンピース」がお役に立つと思います! (BKWP-001) ※写真の形状のウイング以外には取り付けができません。 :開発コンセプト: パワーソースが変化し、Cカーのスピードに比例されて増幅するダウンフォース。 このダウンフォースをより効率よくマシンに伝えたい。 コーナーでぶれるウイングが気になっていたので作りました。 バタついたウイングが気になって、アクセルを戻した場面もありました。 そんな場面を少しでも低減出来たら。 そして、ダウンフォースをもう少し受けきってもらいたい。 そんな思いで開発しました。 ウイングステイを全て板金で作ることも出来ますが、 大きなクラッシュや追突で二次災害の懸念もあるため、 そっと差し入れて、ムフフ。としてもらいたいです。 ん?適当なシャフトで代用できる? はい、そう思います。 ただ、小職は板金の美しさと機能性を伝えていくためにメーカーを立ち上げたので 板金にこだわり、形状の試行錯誤を繰り返し開発しました。 あっ!M3のタップを底面に施していますので、 何か閃いた際にお使いください。 よろしくお願いいたします。 ~組み込みは簡単~ ① ウィンピースをステイの内部に入れ込みます。 ※切り欠きがフロント方向です。 ② 付属のスペーサをウイングステイの左右の小穴に差し込みます。 ※穴が変形している場合もありますので、垂直を意識して押し込みます。 ③ ワッシャを置きM3のトラスねじで固定します。 ※レンチにねじを指で押さえながらだと締め付けがしやすいです。 完成 ウィンピース本体が水平にとりつくように左右のねじを固定してください。 ※本製品を取り付けた事によりセッティング変更がご必要になる場合があります。 取付難易度は★★★☆☆レベル3です。 ※先に、本体をウイングステイの中に入れ込むと組み立て易いです。 ※付属のスペーサーは極力垂直に押し込んでください。 ※ワッシャーの組付けをお忘れないでください。 ※ For international shipping inquiries, please contact me directly through BASE messaging! 材 質:アルミ 板 厚:1.5t 個 数:1ケ 対 応:タミヤCカー TAMIYA Group C Car(C11 、787B、等) 標準ウイングステー使用 付属品:M3トラスねじ×2、M3用ワッシャ×2、1.5tスペーサー×2、 発 送:クリックポスト350円 仕 様:板金部品には製品面に加工上傷が入ることがあります。製品上問題はありません。 仕 様:スペーサーは垂直に押し込んでください。 注 意:素材はアルミです過度に力を加えると変形します。 注 意:素材はアルミです過度に締め付けるとタップが壊れます。 注 意:本体は極力水平を意識して取り付けしてください。 “Win Peace C” / For Tamiya Group C Cars The Tamiya Group C series has continued to be reissued since 2007. At first glance, the chassis structure may look simple. But inside that simplicity is a huge amount of character, history, and pure RC romance. I am one of the many people who have fallen deeply in love with these Group C cars. Because the chassis design remains essentially the same as it was when these cars were originally released, they have a depth and personality that is difficult to explain until you actually drive one. And now… We developed a part that fits into the base area of the standard wing stay on Tamiya Group C cars. The standard wing stay is made from a flexible resin that is difficult to break. That is a very good thing. But personally, I always felt it was just a little less rigid than I wanted. One of the great attractions of Tamiya Group C cars is that, despite keeping essentially the same basic shape for more than 30 years, they can still be driven hard and enjoyed on modern on-road circuits. But power systems have changed dramatically compared with the old days. Speeds are higher. And when speed increases, aerodynamic downforce also increases. I wanted to make just a little more use of that force. That is where this little guy comes in: Win Peace C BKWP-001 Development Concept As power systems have evolved, the speed of Group C cars has increased. And as speed rises, the amount of downforce generated by the wing also increases. I wanted to transmit that downforce to the chassis more efficiently. The original inspiration came from watching the wing move and shake during cornering. There were even times when I found myself backing off the throttle simply because the wing movement was bothering me. If I could reduce that movement, even just a little… And if the wing could accept and transfer just a little more of that downforce… That was the starting point for this product. Of course, it would also be possible to manufacture the entire wing stay from sheet metal. However, in the event of a major crash or rear impact, a fully rigid metal stay could potentially cause additional damage elsewhere. So instead, I wanted to create something more subtle. Something you simply slide into the standard wing stay… and then quietly smile to yourself. Mufufu. You may be thinking: “Couldn’t I just use some random shaft or rod instead?” Yes. Honestly, you probably could. But I started BAnkyRC because I wanted to communicate the beauty, precision, and functionality of sheet-metal parts. So I insisted on making this from sheet metal. I experimented with the shape again and again until I arrived at this design. And one more small detail: There is an M3 threaded hole on the bottom of the main body. If inspiration strikes and you think of another way to use it, please feel free to get creative. That is part of the fun. Easy Installation 1. Insert Win Peace C into the inside of the wing stay. The notched section should face toward the front of the car. 2. Insert the included spacers into the small holes on the left and right sides of the wing stay. The holes may have become slightly distorted over time, so try to push the spacers in as vertically and straight as possible. 3. Place the washers in position and secure everything using the included M3 truss-head screws. It may be easier to tighten the screws if you hold each screw against the wrench with your finger while starting the thread. Installation complete. Please tighten the left and right screws while making sure the Win Peace C main body is installed as horizontally as possible. Important Information Installing this product may change the behavior of the rear wing and chassis. Depending on your vehicle setup and driving style, you may need to make additional setup adjustments after installation. Installation Difficulty ★★★☆☆ Level 3 / 5 * It is easier to assemble if you insert the main Win Peace C body into the wing stay first. * Push the included spacers in as vertically as possible. * Do not forget to install the washers. * Please install the main body as level and horizontal as possible. For international shipping inquiries, please contact me directly through BASE messaging! Specifications Product Name: Win Peace C Product Code: BKWP-001 Material: Aluminum Thickness: 1.5 mm Quantity: 1 main unit Compatible Models: Tamiya Group C Cars using the standard wing stay Examples include: Sauber Mercedes C11, Mazda 787B, and other compatible Tamiya Group C models Included Parts: * 2 × M3 truss-head screws * 2 × M3 washers * 2 × 1.5 mm spacers Shipping in Japan: Click Post ¥250 Product Notes Because this is a sheet-metal component, minor scratches or processing marks may be present on the product surface as a result of manufacturing. These marks do not affect product performance or functionality. The included spacers should be pushed in as vertically as possible. Caution The product is made from aluminum. Applying excessive force may bend or deform the part. The threaded sections are also aluminum. Over-tightening the screws may damage or strip the threads. Please tighten carefully. For best performance, install the Win Peace C main body as horizontally and level as possible.
MORE -


【アウトレット】ハードフロントロングダンパーステイ /アバンテ用単品
28%OFF ¥3,168($20.20)
28%OFF
【アウトレット】 ~アウトレット理由~ 外周および穴加工部位の目立つ焼け跡があるため。 また、曲げの傷が比較的多いため。 取り付けに際する部品はご用意ください。 材 質:SUS304 板 厚:2.5t 寸 法:80mm×50mm 内容物:ハードフロントロングダンパーステイ 対 応:タミヤアバンテ、アバンテ2011、ブラック (アバンテ2001、VQS、イグレスは後記あり) 付属品:なし 発 送:クリックポスト350円 仕 様:アウトレットのためタグはございません。 備 考:アバンテ2001、VQS、イグレスは、ダンパーステイにボディポストがあるので、 既存部品の追加工やボディ固定方法の変更が必要になります。 取り付けに関しては、自己責任のDIYとなります。 注 意:取り付けに際しての、部材はご用意ください。
MORE -

フロントシャフトアームエイド / タミヤスコーチャー・ドラゴン系用
¥1,980($12.62)
タミヤ ドラゴン系統バギー専用商品。 ・スコーチャー ・サンダーショット ・セイントドラゴン ・サンダードラゴン ・ファイヤードラゴン 上記シャーシのフロントA5パーツの【エイド】補強をする板金パーツです。 続々と再版されたワクワクの詰まった4輪駆動バギー達。 販売当時フラットダートで、圧巻の走りを見せていた記憶があります。 フラットダートから3Dサーキットが主流になりつつある現代でも ドラゴンのような走りを、心置きなくしてもらいたくて商品化しました。 ジャンプしてからの片輪着地や、コーナーでのタイヤヒット時に ギアボックスが開いてしまうのを、最大限軽減するために柔らかいサスアームを採用しているドラゴン系ですが、 それでも、ギアボックスへの異物混入やパーツの破損が発生してしまいます。 この不具合を軽減して、【エイド】補強できるパーツがあれば、、、 そこにドラゴンロマンが生まれますね! ※ For international shipping inquiries, please contact me directly through BASE messaging! (BKFFAA1) 組み立て難易度は★★☆☆☆(レベル2です) 本体の固定には「A5パーツ」の固定用の3×12mmタッピングネジを使用します。 必ず、付属の小径1mmアルミスペーサーを入れてから固定してください。 材 質:SUS304 板 厚:1.0t 寸 法:43mm×10mm 内容物:フロントシャフトアームエイド本体 対 応:上記ドラゴン系統バギー 付属品:1mmアルミスペーサー×2 発 送:クリックポスト350円 仕 様:板金部品には製品面に加工上傷が入ることがあります。製品上問題はありません。 Front Shaft Arm Aid / For Tamiya Scorcher & Dragon-Series Buggies A dedicated reinforcement part for Tamiya Dragon-series buggies. Compatible models include: * Scorcher * Thundershot * Saint Dragon * Thunder Dragon * Fire Dragon This sheet-metal reinforcement part is designed to provide additional “Aid” support to the front A5 suspension arm component used on these chassis. These exciting 4WD buggies have been reissued one after another over the years. I still remember how impressive they looked running across flat dirt tracks when they were originally released. Today, RC circuits have changed. Flat dirt tracks are no longer the only playground, and more modern 3D-style courses with jumps and elevation changes have become increasingly common. Even in that kind of environment, I wanted owners to be able to enjoy these machines with the same wild, dragon-like spirit. That feeling became the reason for developing this product. Development Concept The Dragon-series chassis uses relatively flexible suspension arms. That flexibility helps reduce the chance of the gearbox opening up during hard impacts, such as: * Landing a jump on only one front wheel * Hitting a tire or track barrier during cornering * Sudden side loads on the front suspension This flexible design is one of the ways the chassis protects itself. However, even with that design, hard impacts can still lead to problems such as: * Foreign material entering the gearbox * Damage to surrounding parts * Unwanted movement or deformation around the front suspension area So I started thinking: “What if there were a simple part that could reduce these problems and give the A5 area a little extra reinforcement?” That is where this Aid part came from. And when you add just a little more support to these classic machines… That is where the Dragon romance begins. Product Code BKFFAA1 Installation Difficulty ★★☆☆☆ Level 2 / 5 Installation is relatively simple. Use the existing 3 × 12 mm tapping screws that normally secure the A5 parts. Before tightening the screws, be sure to install the included: 1.0 mm small-diameter aluminum spacers The spacers must be installed between the relevant parts before final tightening. Important Information * This product is designed specifically for the listed Tamiya Dragon-series buggy chassis. * Please use the original A5 mounting screws for installation. * Be sure to install the included 1.0 mm aluminum spacers before tightening. * This product is intended to reduce stress and deformation around the front suspension area, but it cannot prevent all damage caused by severe crashes or impacts. For international shipping inquiries, please contact me directly through BASE messaging! Specifications Product Name: Front Shaft Arm Aid Product Code: BKFFAA1 Material: SUS304 Stainless Steel Thickness: 1.0 mm Dimensions: 43 mm × 10 mm Contents: 1 × Front Shaft Arm Aid main body Compatible Models: * Tamiya Scorcher * Tamiya Thundershot * Tamiya Saint Dragon * Tamiya Thunder Dragon * Tamiya Fire Dragon Included Parts: * 2 × 1.0 mm aluminum spacers Shipping in Japan: Click Post ¥250 Product Notes Because this is a sheet-metal component, minor scratches or processing marks may be present on the product surface as a result of manufacturing. These marks do not affect product performance or functionality.
MORE -


【限定生産】「ソルフォス」/2段式タイヤ・ホイールラック
25%OFF ¥3,713($23.67)
25%OFF
限定生産商品 BAnky RCの商品の中で二番目に重く、そして二番目に高価な商品となります。 :開発コンセプト: ラジコンを長い期間楽しんでいると、無計画に買っていたのか? と、自問自答したくなるほど増えるタイヤとホイール。 それでも、お気に入りのホイールやタイヤは存在していて、 いざ!という時に、段ボールを漁ったり、ケースの中を探す事が多く 最悪の結果は、4本揃わない事、、、 それならば、逆に展示するタイヤ・ホイールラックが有ればいいんだ!と。 そこで設計をしたのが、「テラガス」に続き 「ソルフォス」2段式タイヤ・ホイールラックです。 2段式のラック仕様で、最大で、8本のタイヤが収納できます。 「テラガス」の3段ラックまで必要ない方へ、ご提案です。 妥協をせず板厚を2mmにしたことで、重量感がありますので安心してご使用できます。 痒い所に手が届く精神の基、この世に無いモノを作りたい。で 生まれた商品の内の一つです。 (BKSHS-1) 材 質:ステンレス製 板 厚:2.0t 天 面:160mm×50mm×138mm(組み立て時) 重 量:250g(組み立て時) 内容物:「ソルフォス」/ Tire Wheel Rack Teragass本体 ラックシャフト8本、トラスねじM3-6mm8本 発 送:クリックポスト350円 仕 様:製品面に加工上傷が入ることがあります。製品上問題はありません。 注 意:レーザー加工は、故意に擦ると消えてしまいます。 由 来:賢者の様にしっとりと優れた存在感を、そんな思いを基に、 ギリシャ語の「ソフォス(σοφός)/賢者」から商品名を決めました。
MORE -

「ファンブゥ GⅡ」/ グラスホッパーⅡ専用ファンブラケット
¥1,540($9.82)
タミヤ グラスホッパーの販売から4年後に販売されたグラスホッパーⅡは 2017年に再版されてからも今もサーキットやイベントでよく書けます。 グラホと同様に、ロングセラーラジコンの内の1台です。 そう、グラホと合わせて複数台所有されている方が多いでしょう。 380モーター標準搭載。走りはまさに飛蝗のような走り。 ただ初代のグラホからは進化をしっかりしているのがグラホⅡ Ⅱの名に恥じないRCです! そんな、グラスホッパーⅡのモーターを冷やす商品を作りました。 「ファンブゥGⅡ」です。 (BKFG2-002) :開発コンセプト: グラホのファンブゥがあるなら グラホⅡのファンブゥを作るのは 自然の摂理。 が、コンセプトです。 既に、DIYでつけている方も多いと思いますが、 ポン付けできる、ファンブゥGⅡは如何ですか? ※写真のファン本体は付属しません。 ※30ファンサイズ用です。 ※厚みがあるものはボディと干渉します。ご注意ください。 取付難易度は★★☆☆☆レベルⅡです。 材 質:アルミ 板 厚:1.5t 個 数:1ケ 対 応:タミヤグラスホッパーⅡ専用 付属品:M3トラスねじ×2、ナット×2 発 送:クリックポスト350円 仕 様:板金部品には製品面に加工上傷が入ることがあります。製品上問題はありません。 注 意:素材はアルミです過度に力を加えると変形します。 注 意:素材はアルミです過度に締め付けるとタップが壊れます。 ※ For international shipping inquiries, please contact me directly through BASE messaging! # FANBoo G II / Cooling Fan Bracket for Tamiya Grasshopper II **Product No.: BKFG2-002** The Tamiya Grasshopper II was released four years after the original Grasshopper. Since its re-release in 2017, it has remained a familiar sight at RC circuits and events. Just like the original Grasshopper, it's one of Tamiya's long-selling RC cars. And yes, I'm sure many RC enthusiasts own both models — perhaps even several of each! Equipped with a standard 380-size motor, the Grasshopper II runs just like its namesake — a real grasshopper! But make no mistake, the Grasshopper II has evolved considerably from the original. **It's an RC car that truly deserves the "II" in its name!** So, we created a product to help cool the motor of this legendary machine. Introducing... **FANBoo G II!** --- ## Development Concept If there's already a FANBoo for the original Grasshopper... Then making a FANBoo for the Grasshopper II is simply the natural order of things! That's the concept behind this product. I'm sure many Grasshopper II owners have already installed their own DIY cooling fans. But how about a **FANBoo G II that you can install without any modifications?** Simple, convenient, and made specifically for the Grasshopper II! ### Important Notes - The cooling fan shown in the photos is not included. - Designed for 30 mm cooling fans. - Thicker cooling fans may interfere with the body shell. Please check clearance before installation. ## Product Specifications **Installation Difficulty:** ★★☆☆☆ (Level 2) - **Material:** Aluminum - **Thickness:** 1.5 mm - **Quantity:** 1 piece - **Compatibility:** Tamiya Grasshopper II only - **Included Hardware:** M3 truss head screws × 2, nuts × 2 - **Domestic Shipping:** Click Post — ¥350 ## Product Notes & Precautions - Minor scratches may occur on the surface of sheet metal parts during manufacturing. These do not affect the product's functionality. - The product is made of aluminum. Applying excessive force may cause deformation. - Do not overtighten the screws, as excessive torque may damage the threaded holes in the aluminum. **For international shipping inquiries, please contact me directly through BASE messaging!**
MORE -
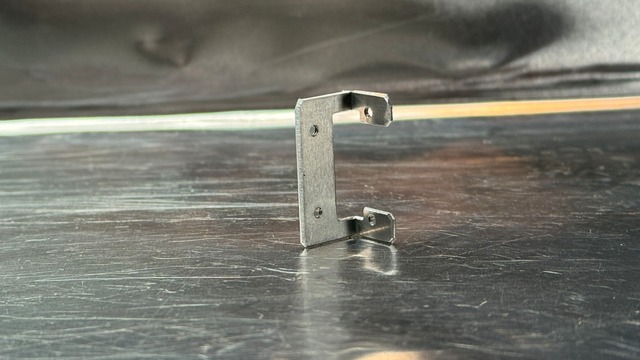
Bramy-T / Switch Bracket for Tamiya THW-1060 ESC
¥1,430($9.12)
タミヤさんの海外販売キットに同梱された 販売用のESCを タミヤRCキットの標準位置で使用できるパーツてす。 (BKBMT-002) タミヤ THW-1060 ESC専用です。 先ずは英語表記からとなります。 Bramy-T is here! Bramy-T is a dedicated switch mounting bracket developed specifically for the THW-1060 brushed ESC supplied with certain Tamiya RC kits sold overseas. The concept comes from our original Bramy. Bramy was created to mount an ESC power switch neatly and securely in the standard switch position specified in Tamiya RC kit instructions. But there was one problem. The THW-1060 uses a different switch design, which means the original Bramy cannot be used with it. So we made one. Not an adapter. Not a compromise. A new Bramy designed specifically for the THW-1060. That is Bramy-T. And yes — the “T” stands for Tamiya. ⸻ What is Bramy-T? Bramy-T securely holds the THW-1060 power switch and allows it to be mounted neatly in the standard switch mounting position on compatible Tamiya chassis. No more wondering where to put the switch. No more leaving it loose inside the chassis. Bramy-T brings the THW-1060 switch back where it belongs. Simple. Small. Sheet metal. Designed specifically for the THW-1060. Made in Japan by BAnkyRC. ⸻ Features ・Designed specifically for the THW-1060 ESC power switch ・Allows the switch to be installed in the standard Tamiya chassis switch mounting position ・Secure metal construction helps reduce movement when operating the ON/OFF switch ・Compact design keeps the chassis layout clean ・Designed and manufactured by BAnkyRC in Japan ⸻ Installation Difficulty ★★☆☆☆ Level 2 Installation is relatively simple. Please note: ・Depending on the switch mounting position, you may need to reposition the ESC. ・The supplied screws are very small. Please be careful not to drop or lose them during installation. ・Because the screws are small, please be careful not to overtighten them. ⸻ Specifications Product: Bramy-T Application: Switch mounting bracket for THW-1060 brushed ESC Material: Aluminum Thickness: 1.0 mm Quantity: 1 bracket Made in: Japan Compatibility: Tamiya chassis including: Grasshopper I / II DT-02 / DT-03 / DT-04 Lunch Box series TT-01 / TT-02 CC-01 / CC-02 M-05 BBX Monster Beetle MB-01 Fighter NXGEN Tamiya Group C chassis and more. We are continuously testing Bramy-T on additional Tamiya chassis, and the compatibility list will be updated as testing continues. ※ Compatibility may vary depending on chassis configuration, installed option parts, ESC position and wiring layout. ⸻ Included Parts ・Bramy-T × 1 ・M2 pan-head screws × 2 For securing the THW-1060 switch to Bramy-T ・M2 truss-head screws × 2 For securing Bramy-T to the chassis ⸻ Installation Notes ・Check the ON/OFF direction of the switch before final installation. ・Do not overtighten the small mounting screws. ・Depending on the chassis layout, you may need to reposition the ESC to allow the switch and wiring to reach the standard mounting position. ・Check for interference between the bracket, mounting screws, chassis and other components before driving. ⸻ Shipping Domestic shipping within Japan: Click Post ¥250 For international orders: International customers are required to pay both the domestic shipping fee within Japan and an additional international shipping fee. For international orders and shipping, please follow BASE’s rules and procedures. International shipping is available in accordance with BASE’s international shipping policies and procedures. ⸻ Product Notes & Precautions ・Bramy-T is specifically designed for the THW-1060 ESC switch. It is different from the original Bramy. Please check your ESC model and switch shape carefully before purchasing. ・THW-1060 ESC is not included. ・Tamiya RC chassis, electronics, spacers and other RC components shown in the product photos are not included unless otherwise stated. ・Because Bramy-T is a sheet-metal product, minor scratches or processing marks may be present on the product surface. These are a normal result of the manufacturing process and do not affect functionality. ・Depending on the switch mounting position, you may need to reposition the ESC. ・Bramy-T is made of aluminum. Applying excessive force may bend or deform the product. ・Because the product is aluminum, overtightening the screws may damage the threaded holes. Do not overtighten. ・Depending on the installation direction or chassis, the Bramy-T mounting screws may interfere with other components. If necessary, please prepare and use suitable spacers. ・The supplied M2 screws are very small. Please take care not to drop or lose them during installation. ・Compatibility may vary depending on chassis configuration, ESC location and installed option parts. ⸻ The original Bramy started in Japan. But Bramy-T was created for RC fans beyond Japan. To our Tamiya brothers around the world: We made this one for you. Enjoy your Tamiya. Enjoy your RC. Bramy-T — Made in Japan by BAnkyRC. ↓日本語にて↓ Bramy-T、登場! Bramy-Tは、海外で販売されている一部のタミヤRCキットに付属するTHW-1060ブラシESC専用として開発したスイッチマウントブラケットです。 そのコンセプトの原点は、オリジナルのブラミィにあります。 ブラミィは、HW1060ESCの電源スイッチを、タミヤRCキットの取扱説明書で指定されている標準のスイッチ位置に、すっきりと確実に取り付けるために生まれました。 しかし、ひとつ問題がありました。 THW-1060はスイッチの形状が異なるため、オリジナルのBramyを使用することができません。 だったら、作ろう。 アダプターではありません。 妥協したものでもありません。 THW-1060のために、新しいブラミィを作りました。 それが、 Bramy-T。 そしてもちろん―― 「T」は、TAMIYAのTです。 Bramy-Tとは? Bramy-Tは、THW-1060の電源スイッチをしっかりと保持し、対応するタミヤシャーシの標準スイッチ取付位置へ、すっきりと取り付けることができます。 もう、スイッチをどこに置こうか悩む必要はありません。 シャーシの中でスイッチをブラブラさせておく必要もありません。 THW-1060のスイッチを、本来あるべき場所へ。 シンプル。 小さい。 そして、板金。 THW-1060のために専用設計しました。 日本のBAnkyRCが作る、Made in Japan。 特徴 ・THW-1060 ESCの電源スイッチ専用設計 ・タミヤシャーシの標準スイッチ取付位置への装着が可能 ・金属製のしっかりした構造により、ON/OFF操作時のスイッチの動きを抑えます ・コンパクトな設計で、シャーシ内のレイアウトをすっきり保ちます ・日本のBAnkyRCが設計・製造 取付難易度 ★★☆☆☆ レベル2 取り付けは比較的簡単です。 ただし、以下の点にご注意ください。 ・スイッチの取付位置によっては、ESC本体の位置を変更する必要があります。 ・付属のネジは非常に小さいため、取り付け時の落下・紛失にご注意ください。 ・小さなネジですので、締めすぎにもご注意ください。 仕様 商品名: Bramy-T 用途: THW-1060ブラシESC用スイッチマウントブラケット 材質: アルミ 板厚: 1.0mm 数量: 1個 製造国: 日本 対応タミヤシャーシ ・グラスホッパー I / II ・DT-02 / DT-03 / DT-04 ・ランチボックス系 ・TT-01 / TT-02 ・CC-01 / CC-02 ・M-05 ・BBX ・モンスタービートル ・MB-01 ・ファイターネクシュジェン ・タミヤ Cカーシャーシ ・その他 Bramy-Tは現在もさまざまなタミヤシャーシで搭載確認を続けています。 確認が取れたシャーシは、今後も対応リストへ随時追加していきます。 ※シャーシの仕様、装着しているオプションパーツ、ESCの位置、配線レイアウトなどによって、適合状況が異なる場合があります。 付属品 ・Bramy-T × 1 ・M2なべネジ × 2 THW-1060のスイッチをBramy-Tへ固定するために使用します。 ・M2トラスネジ × 2 Bramy-Tをシャーシへ固定するために使用します。 取付時の注意 ・最終的に固定する前に、スイッチのON/OFF方向をご確認ください。 ・小さな取付ネジを締めすぎないようにしてください。 ・シャーシレイアウトによっては、スイッチと配線を標準取付位置まで届かせるため、ESC本体の位置を変更する必要があります。 ・走行前に、ブラケット、取付ネジ、シャーシ、その他の部品との干渉がないことをご確認ください。 発送について 日本国内:クリックポスト 350円 海外からのご注文について 海外のお客様には、日本国内送料に加えて、別途海外発送にかかる送料をご負担いただきます。 海外からのご注文および発送については、BASEの規定・手続きに従ってください。 BASEの海外発送に関するポリシーおよび手続きに基づき、海外発送に対応しています。 商品について・注意事項 ・Bramy-Tは、THW-1060 ESCのスイッチ専用品です。オリジナルのBramyとは異なる商品です。ご購入前にESCの型番およびスイッチ形状をよくご確認ください。 ・THW-1060 ESC本体は付属しません。 ・商品写真に写っているタミヤRCシャーシ、メカ類、スペーサー、その他RC部品は、特に記載がない限り付属しません。 ・Bramy-Tは板金製品のため、製造工程上、製品表面に細かな傷や加工痕が入る場合があります。これらは製造上発生するもので、製品の機能には問題ありません。 ・スイッチの取付位置によっては、ESC本体の位置を変更する必要があります。 ・Bramy-Tはアルミ製です。過度な力を加えると、曲がりや変形が発生する場合があります。 ・アルミ製品のため、ネジを過度に締め付けるとネジ穴を傷める可能性があります。締めすぎないようご注意ください。 ・取付方向やシャーシによっては、Bramy-Tの固定ネジが他の部品と干渉する場合があります。必要に応じて適切なスペーサーをご用意のうえ、調整してください。 ・付属のM2ネジは非常に小さいため、取り付け時の落下・紛失にご注意ください。 ・シャーシの仕様、ESCの搭載位置、装着しているオプションパーツなどによって、適合状況が異なる場合があります。 BramyからBramy-Tへ オリジナルのBramyは、日本で生まれました。 でも、 Bramy-Tは、日本の外にいるRCファンのために生まれました。 世界中のタミヤを愛する仲間たちへ。 これは、あなたたちのために作りました。 タミヤを楽しもう。 RCを楽しもう。 Bramy-T — Made in Japan by BAnkyRC.
MORE -


ハードフロントAアームエイドセット /タミヤCカー用
¥4,070($25.95)
SOLD OUT
2007年より再販を続けている、タミヤCカーシリーズ 単純と思われるシャーシ構造の中に、ロマンがたくさん詰まっているCカー。 販売当時とシャーシ構造が同じだからこそ、 奥が深く味わい深い1台です。 そして! レイテックサーキットで開催される 【2025 ロマン2.4h グループP(OP搭載クラス)】で 使用可能と言う大変光栄なパーツ指定を頂きました! :開発コンセプト: コース周回中にコーナーにヒットして、フロントAアームが曲がり、 プライヤーで戻すも、キャンバー角度もキャスター角度もガタガタになりサポート商品を待つ日々。 そんな悲しい時間を極力減らすと、それはエンジョイRCライフだ! が、開発コンセプトです!! F1シャーシよりは、フロントタイヤに直接ヒットさせることは少ないですが。 それでもヒットの際は、ステアリングを切っていることが多くAアームへの負担は大きいです。 万が一曲がってしまっても、プライヤーなどで戻せるのですが成形品の寸法に戻す事は不可能でした。 更にDDの挙動を一度ヒットしたAアームで制御するのは至難の業と思っております。 ズバリ!転ばぬ先の杖です。 もとい!曲がる前のAアームエイドです! 本商品は、お持ちのフロントAアームに追加工が必要ですが、 取り付けて剛性が上がるのでコーナー時の過重と挙動が、 タイヤ→アップライト→アップライトスプリング→アームと、 順に伝わることで、マシンの挙動がわかりやすくなります。 そしてセッティングも順を追って確認できるので、ますますCカーが好きになると思います。 そんな私も、そのうちに一人ですし。 過度にヒットしてしまっても、Aアームの曲がりは極端に少なくなります。 取り付け後に、マシンセッティング変更が必要になる場合がございます。 ※全ての衝撃から守るものではありません。 ※ For international shipping inquiries, please contact me directly through BASE messaging! (BKHFA LR1) タミヤ Cカー用。 左右セット。 組み立て難易度は★★★★★(レベル5です) ※フロントAアームに追加工が必要です。 Φ3でのドリル貫通作業とリーマー加工を推奨します。 :装着による確認される効果: ・軽度のフロント部ヒット時のAアームの曲がり低減。 ・主にコーナーでかかる荷重挙動がわかりやすくなる。 ・剛性UP ・Tバーのセッティング変化がわかりやすくなる。 材 質:SUS304 板 厚:1.0t 寸 法:40mm×20mm 内容物:ハードフロントAアームエイドセット(右・左各1個) 対 応:タミヤCカー TAMIYA Group C Car 付属品:①M3x28六角穴付きボルトx2、②インシュロック×2 ③ナット×2 ④スプリングワッシャ×2 発 送:クリックポスト350円 仕 様:板金部品には製品面に加工上傷が入ることがあります。製品上問題はありません。 仕 様:取り付け後にマシンセッティング変更が必要になる場合もございます。 仕 様:対象シャーシへの取付は付属のネジをご利用下さい。 仕 様:お持ちのフロントアームにキリでの追加工が必要となります。 推奨はΦ3のキリです。大きすぎる穴はガタの原因となります。 加工実績から最大径で3.2mmとなります。(多少ガタあり) Hard Front A-Arm Aid Set / For Tamiya Group C Cars The Tamiya Group C series has continued to be reissued since 2007. At first glance, the chassis structure may seem simple. But inside that simplicity is a huge amount of character, history, and pure RC romance. And because the basic chassis structure remains essentially the same as when these cars were originally released, they still offer incredible depth and enjoyment even today. And now, we have some very special news. This part has been officially approved for use in the: “2025 Roman 2.4h Group P” OP-equipped class held at Raytech Circuit. It is a great honor for us to have this product recognized as an eligible part for the event. Development Concept Imagine this: You are running laps at the circuit. You clip a corner. The front A-arm bends. You try to straighten it back with pliers, but now the camber angle and caster angle are both out. And then you are left waiting for replacement or support parts before you can really enjoy the car again. I wanted to reduce those frustrating moments as much as possible. Because fewer broken parts and less downtime means more time enjoying RC. That is the basic development concept behind this product. Compared with an F1 chassis, direct impacts to the front tires may happen less frequently on a Group C car. But when an impact does happen, the steering is often already turned. That can place a surprisingly large load on the A-arm. If the A-arm bends, it may be possible to bend it back with pliers or another tool. However, returning it precisely to its original molded dimensions is extremely difficult. And with a direct-drive chassis, trying to control the car accurately using an A-arm that has already been bent once can become very difficult. So this product is, quite simply: A little prevention before trouble happens. Or rather… An A-Arm Aid before the arm bends! What This Product Does This product requires additional modification to your existing front A-arms before installation. However, once installed, it increases front A-arm rigidity. That added rigidity can help make the load path through the front suspension easier to understand: Tire → Upright → Upright Spring → A-Arm By making the way the load moves through the front end more noticeable, the behavior of the car during cornering can become easier to read. That also makes it easier to evaluate setup changes step by step. And the more you understand the car… the more you may find yourself falling even deeper into the world of Tamiya Group C cars. I certainly did. Even in the event of a harder impact, the amount of A-arm bending can be significantly reduced compared with the standard setup. However, please note: This product does not protect the vehicle from every possible impact or crash. Depending on your setup, changes to the vehicle’s suspension or chassis settings may be required after installation. Product Code BKHFA LR1 For Tamiya Group C cars. Includes both left and right sides. Installation Difficulty ★★★★★ Level 5 / 5 This product requires modification of the existing front A-arms. A through-hole must be drilled in each A-arm. We recommend using a: Φ3.0 mm drill bit followed by careful reaming if necessary. Do not make the hole unnecessarily large, as excessive clearance may create unwanted play. Based on our installation experience, the maximum recommended hole diameter is approximately: 3.2 mm Please note that some play may already be present at this diameter. Confirmed Effects After Installation * Helps reduce A-arm bending during light front-end impacts * Makes front-end load behavior during cornering easier to understand * Increases front A-arm rigidity * Makes changes in T-bar setup easier to feel and evaluate Important Information * Additional machining of the existing front A-arms is required. * Vehicle setup changes may be necessary after installation. * Please use the included hardware when installing this product on the intended chassis. * This product is designed to reduce damage and deformation, but it cannot prevent damage from all crashes or impacts. For international shipping inquiries, please contact me directly through BASE messaging! Specifications Product Name: Hard Front A-Arm Aid Set Product Code: BKHFA LR1 Material: SUS304 Stainless Steel Thickness: 1.0 mm Dimensions: 40 mm × 20 mm Compatible Chassis: Tamiya Group C Car chassis Contents: * 1 × Right Hard Front A-Arm Aid * 1 × Left Hard Front A-Arm Aid Included Hardware: * 2 × M3 × 28 socket head bolts * 2 × cable ties * 2 × nuts * 2 × spring washers Shipping in Japan: Click Post ¥250 Product Notes Because this is a sheet-metal component, minor scratches or processing marks may be present on the product surface as a result of manufacturing. These marks do not affect product performance or functionality. After installation, changes to the vehicle setup may be required. Please use the included screws and hardware for installation on the intended chassis. Machining Note Your existing front A-arms must be drilled before installation. We recommend using a Φ3.0 mm drill bit. A hole that is too large may cause unwanted looseness or play. Based on our installation experience, approximately 3.2 mm is the maximum practical diameter, although some play may occur at this size. Please perform all drilling and reaming carefully. Improper machining may affect fit, alignment, and vehicle performance.
MORE -

「ファンブゥLB」/ タミヤ ランチボックス系ファンブラケット
¥1,980($12.62)
一家に一台。 そんなラジコンがあります。 それは、タミヤ ランチボックス。 その歴史は古く、初版は1987年。 2027年で40周年を迎えるロングセラーラジコン シャーシ構造は昔と変わることがなく、ボディバリエーションが多く存在し 今日もその人気は衰えることを知りません。 その、誰にでも愛されるランチボックス。 組み立てれば感じるワクワク感。 走らせれば、誰もがトリコになる一台。 タミヤ ランチボックス!! 「そのランチボックスに取り付けられるファンブラケットを開発しました。」 (自称 業界初) ノーマルモーターでも十分に笑いと感動を与えてくれるランチボ。 また、見た目とは裏腹に、ワイルドな走りも見せてくれるランチボは 気が付くと、アクセル握りっぱなしになっていたり。 駄々っ子な挙動を抑えて走らせる、操縦感もあるランチボは 気が付くと、夢中になって遊んでしまいます。 そんな時の、モーターの冷却は、 この子「ファンブゥLB」がお役に立つと思います! (BKFLB-001) :開発コンセプト: 「いつか、BAnkyRCでランチボのファンブラケットを作るぞ」 が、コンセプトです。 なぜかって? 私もランチボックスの魅力に持っていかれているうちの一人だからです。 ランチボって、無理がきくラジコンだと思います。 何処でも走れる、どこでも走らせてみたくなる一台です。 その子のモーターをいい塩梅に冷やして、より長く遊んでもらいたい。 が、商品開発の思いの一つでもあります。 ~組み込みは簡単~ ※保護フィルムがある場合はがしてご利用ください。 ① 先ずは、ファンブゥLBにお持ちのファンを固定します。 ※ファンサイズは30専用です。 ② ファンを固定したファンブゥLBをリア下部よりシャーシの長穴切り欠き部へ斜めにして押し入れます。 ※ファンブゥ本体をフロント側に斜めにして押し上げると入れやすいです。 ③ 付属のM3トラスねじで固定します。 ※電動は使用せず、手での締め付け推奨。 完成 ※ランチボ標準ダンパーストローク用のファンブラケットです。 ※CVAダンパー搭載のCW01シャーシの対応は確認中です。 ※モーターケーブルの配線箇所の移動が必要になる場合があります。 ※改造を行っている際の干渉等は、ご自身のDIYを駆使してください。 ※商品写真のファンは付属しません。 ※ For international shipping inquiries, please contact me directly through BASE messaging! 取付難易度は★★★★☆レベル4です。 ※ファンサイズは30専用です。 ※先に、お持ちのファンを本体へ取り付けてください。 ※改造されているときに干渉等の回避はご自身のDIYにて。 ※すべてのCW01シャーシの搭載確認は行っていません。 材 質:アルミ 板 厚:1.5t 個 数:1ケ 対 応:タミヤ ランチボックス・ミッドナイトパンプキン等 付属品:M3トラスねじ×2 発 送:クリックポスト350円 仕 様:標準ダンパーストローク用のファンブラケットです。 仕 様:板金部品には製品面に加工上傷が入ることがあります。製品上問題はありません。 注 意:素材はアルミです過度に力を加えると変形します。 注 意:素材はアルミです過度に締め付けるとタップが壊れます。 One for Every Home. There is one RC car that deserves a place in every home. The Tamiya Lunch Box. Its history goes all the way back to 1987. In 2027, it will celebrate its 40th anniversary — a true long-selling classic in the world of RC. The basic chassis design has remained largely unchanged over the years, while many different body variations have appeared. Even today, its popularity shows no sign of fading. The Lunch Box is loved by almost everyone. Building one gives you that unmistakable excitement. Drive one, and before you know it, you are completely hooked. The Tamiya Lunch Box. And now… We developed a cooling fan bracket made specifically for the Lunch Box. (Self-proclaimed industry first!) Even with the standard motor, the Lunch Box delivers more than enough fun, laughter, and excitement. Despite its playful appearance, it can also run surprisingly wild. Before you know it, you may find yourself holding the throttle wide open again and again. At the same time, its slightly unruly behavior is part of the fun. Learning how to control it is what makes driving the Lunch Box so addictive. And when you find yourself playing with it for longer than expected, motor cooling becomes increasingly important. That is where this little guy comes in: FANBoo LB BKFLB-001 We hope FANBoo LB will help keep your Lunch Box motor at a comfortable temperature so you can enjoy driving for longer. Development Concept The concept was very simple: “Someday, BAnkyRC is going to make a fan bracket for the Lunch Box.” Why? Because I am also one of the many people who have completely fallen for the charm of the Lunch Box. To me, the Lunch Box is an RC car that lets you get away with almost anything. You can drive it almost anywhere. And whenever you see a new place, you start wondering: “Could I drive my Lunch Box here?” That is exactly the kind of RC car it is. One of the ideas behind this product was to give its motor just the right amount of cooling and help owners enjoy their Lunch Box for longer. That feeling is what led to the development of FANBoo LB. Easy Installation Please remove any protective film from the product before installation, if present. 1. Attach your cooling fan to FANBoo LB. FANBoo LB is designed specifically for 30 mm fans. 2. Insert FANBoo LB from the lower rear side of the chassis. Tilt the bracket diagonally and push it into the elongated chassis opening/notched section. For easier installation, angle the FANBoo LB body slightly toward the front of the vehicle while pushing it upward into position. 3. Secure the bracket using the included M3 truss-head screws. Hand tightening is recommended. Do not use an electric screwdriver or power tool. Installation complete! Important Information * This fan bracket is designed for the standard Lunch Box suspension/damper stroke. * Compatibility with CW-01 chassis equipped with CVA dampers is currently being checked. * Depending on your setup, it may be necessary to reposition the motor wiring. * If your vehicle has been modified and interference occurs, please use your own DIY skills and judgment to make the necessary adjustments. * The cooling fan shown in the product photos is not included. * FANBoo LB is designed specifically for 30 mm fans. * Not every possible CW-01 chassis configuration has been tested. For international shipping inquiries, please contact me directly through BASE messaging! Installation Difficulty ★★★★☆ Level 4 / 5 Please install your cooling fan onto the bracket before mounting FANBoo LB to the chassis. If your vehicle has been modified, any interference or clearance issues may require your own DIY adjustments. Specifications Material: Aluminum Thickness: 1.5 mm Quantity: 1 bracket Compatible Models: Tamiya Lunch Box, Midnight Pumpkin, and other compatible CW-01 applications Included Hardware: 2 × M3 truss-head screws Shipping in Japan: Click Post ¥250 Design: Fan bracket intended for standard damper stroke setups Product Notes Because this is a sheet-metal component, minor scratches or processing marks may be present on the product surface as a result of manufacturing. These marks do not affect product performance or functionality. Caution The product is made from aluminum. Applying excessive force may bend or deform the bracket. The threaded sections are also aluminum. Over-tightening the screws may damage or strip the threads. Please tighten carefully by hand.
MORE -

ホイールステッカー A Type / HOBBY AID
¥880($5.61)
HOBBY AIDの限定販売商品です。 数量限定販売をしております。 :開発コンセプト: 【おしゃれは足元から♪】 ゆるぅ~く、ラジコンをドレスアップしたい! それなら、ダニエルで解決。 ラリーカーにピッタリなデザインに仕上げました! タミヤ製品SP-1021にピッタリです! こちら以外の取り付けは確認していませんが、 下記動画をご参考になさって下さい。 材 質:シートベースはエンビ印刷用 材 質:トップコートはUV機能付き 外 径:約Φ31 内 径:約Φ21 内容物:ホイールステッカー AType×4,ダニエルステッカー×4 発 送:クリックポスト350円 仕 様:タミヤラリーディッシュホイール SP-1021使用推奨 注 意:ホイールは付属しません 注 意:その他のホイールへの使用は未確認です
MORE -

ハードフロントダンパーステイ /アバンテ用
¥3,300($21.04)
タミヤRCシリーズで、レース参戦への為に開発されたアバンテは 滝博士とTRFの結晶であり伝説のRCです。 それゆえに、最も歴史的で芸術的なRC。 2011年より改良されて復刻。 このフォルムをそのままに、現在の3Dオフロードコースを 限界まで走れる商品が この、ハードフロントダンパーステイです。 :開発コンセプト: アバンテのフォルムをそのままに、ダンパーステイを強化したい。 フラットダート向きな純正の金Fショートダンパーで 走るから「アバンテ」なんだ。 そんな、声が降ってきたのが開発のスタートでした。 現行の3Dコースを標準のまま走らせると、ねじのゆるみや破損、 または、強制的なアンダーが出てしまうことが多いと感じます。 しかし、このハードフロントダンパーステイを装着することで ①部品破損の低減 ②フロント回りのねじのゆるみ低減 ③グリップ力の確保 さらに、ボディの脱着も楽になるダンパーステイです。 →板金カットの限界まで挑戦しました。 (BKH-AVA1) タミヤ アバンテ・アバンテ2011・アバンテブラック用。 (キット付属のダンパーが使用できます) (ダブルピロボールに1mmのスペーサーを2枚追加して付属の薄ナットで固定します) 組み立て難易度は★★★★★(レベル5です) ※装着用にビス及びスペーサー等は同梱しております。 ※フランジナット等をご使用の際はバンパー側でナットを取付ください。 ※ダンパーステイを固定する際のボルト挿入位置は任意となります。 ※ For international shipping inquiries, please contact me directly through BASE messaging! 材 質:SUS304 板 厚:2.5t 寸 法:60mm×40mm 内容物:ハードフロントダンパーステイ 対 応:タミヤアバンテ、アバンテ2011、ブラック (アバンテ2001、VQS、イグレスは後記あり) 付属品:①M3x14トラスビスx2、②M3x15トラスビスx2 ③3mmスペーサー×4、④1mmスペーサー×2 ⑤M3ナット×4、 ⑥スプリングワッシャ×2 簡易説明書(上記番号を参考にしてください) 発 送:クリックポスト350円 仕 様:板金部品には製品面に加工上傷が入ることがあります。製品上問題はありません。 仕 様:対象シャーシへの取付は付属のネジをご利用下さい。 備 考:アバンテ2001、VQS、イグレスは、ダンパーステイにボディポストがあるので、 既存部品の追加工やボディ固定方法の変更が必要になります。 取り付けに関しては、自己責任のDIYとなります。 :商品搭載写真は開発中の物も含まれます。使用パーツの差異がある場合があります。
MORE -


ハードフロントロングダンパーステイ /アバンテ用
¥4,400($28.05)
タミヤRCシリーズで、レース参戦への為に開発されたアバンテは 滝博士とTRFの結晶であり伝説のRCです。 それゆえに、最も歴史的で芸術的なRC。 2011年より改良されて復刻。 アイデンティティはそのままに、 各部をブラッシュアップしその良さを活かす 「アバンテ」の ハードフロントロングダンパーステイです。 (※フロントのダンパーを通常バギーF用に換装できるステイです) :開発コンセプト: アバンテを現在のサーキットで自在に走らせる 【蒼い彗星】 にしたい。 がコンセプトです。 フラットダート向きな純正の金Fショートダンパー設計から 現行の3Dサーキットコースを自在に壊すことなく走らせる。 ダンパー長65~75mmをフロントに装着することで ①フロントダンパーの容量UP ②Fアーム運動を阻害しない高さと角度の確保 ③リバウンドの確保 上記の効果により、グリップ力の向上、故障軽減、 さらに、ボディの脱着も楽になるダンパーステイです。 (BKHL-AVA1) タミヤ アバンテ・アバンテ2011・アバンテブラック用。 (65~75mm程度のロングダンパーが装着できるようになります) (CVA、DF-03用、エアレーション、GF-01用OPアルミダンパー等が使用できます) ※ハイキャパシティダンパーを搭載されたい場合はシャフト交換などDIYが必要になります。 組み立て難易度は★★★★★(レベル5です) ※装着用にビス及びスペーサー等は同梱しておりますが、ダンパーの種類によっては 取付の工夫と追加スペーサ等が必要になる場合がございます。 :装着による確認される効果: ・通常のバギー用のフロントダンパーが装着加工になります。(ご準備ください) ・フロントアーム上下運動とダンパーピストン運動が適正化(円弧運動)の傾向となる。 ・リバウント量が増加するので、フロント部のアームやアクスルの破損低減。 ・ビス脱落・ゆるみの低減。←これがかなり厄介だと思います。 ・ジャンプ~着地時の暴れ抑制やスムーズな挙動により特にフロント部への負担低減。 ※ For international shipping inquiries, please contact me directly through BASE messaging! 材 質:SUS304 板 厚:2.5t 寸 法:80mm×50mm 内容物:ハードフロントロングダンパーステイ 対 応:タミヤアバンテ、アバンテ2011、ブラック (アバンテ2001、VQS、イグレスは後記あり) 付属品:①M3x14トラスビスx4、②M3x15トラスビスx2 ③3mmスペーサー×4、④1mmスペーサー×2 ⑤M3ナット×4、 ⑥M3用ワッシャ・スプリングワッシャ各×4、 簡易説明書(上記番号を参考にしてください) 発 送:クリックポスト 仕 様:板金部品には製品面に加工上傷が入ることがあります。製品上問題はありません。 仕 様:対象シャーシへの取付は付属のネジをご利用下さい。 備 考:アバンテ2001、VQS、イグレスは、ダンパーステイにボディポストがあるので、 既存部品の追加工やボディ固定方法の変更が必要になります。 取り付けに関しては、自己責任のDIYとなります。 注 意:商品搭載写真は開発中の物も含まれます。使用パーツの差異がある場合があります。
MORE -

ホイールステッカー B Type / HOBBY AID
¥880($5.61)
HOBBY AIDの限定販売商品です。 数量限定販売をしております。 :開発コンセプト: 【おしゃれは足元から♪】 ゆるぅ~く、ラジコンをドレスアップしたい! それなら、ダニエルで解決。 ラリーカーにピッタリなデザインに仕上げました! タミヤ製品SP-1021にピッタリです! こちら以外の取り付けは確認していませんが、 下記動画をご参考になさって下さい。 材 質:シートベースはエンビ印刷用 材 質:トップコートはUV機能付き 外 径:約Φ31 内 径:約Φ21 内容物:ホイールステッカー BTypeB×4,ダニエルステッカー×4 発 送:クリックポスト250円 仕 様:タミヤラリーディッシュホイール SP-1021使用推奨 注 意:ホイールは付属しません 注 意:その他のホイールへの使用は未確認です
MORE -

「ファンブゥ GⅠ DX」/ グラスホッパー専用ファンブラケット+カバドン
¥2,200($14.02)
2026年で、タミヤ グラスホッパーは販売から42年。 ロングセラーラジコンの内の1台です。 カラーバリエーションも多く存在し、複数台所有されている方が多いでしょう。 380モーター標準搭載。走りはまさに飛蝗のような走り。 いじり甲斐があるラジコンでもありますね。 そして、何台持っていてもいいラジコンと思います。 そんな、グラスホッパーにモーターを冷やしつつ プラスチックボディのいいアクセントになつつ セメント抵抗ダミーもついてデラックスな部品を 作りました! 「ファンブゥGⅠ DX」です。 (BKFGDX-001) :開発コンセプト: グラホのリアが少し寂しい。 ここに、プレートをいれて、、 おお! なんか、ファンが見えててかっこいいぞ! これは、商品化して皆さんに使ってもらいたい! そして、価格も抑えめに! ん!?カバドンのアルミ板もつけちゃおう! が、コンセプトです。 既に、DIYでつけている方も多いと思いますが、 ポン付けできる、ファンブゥGⅠ DXは如何ですか? そっと取り付けて、ムフフ。としてもらいたいです。 はい、販売当時のグラホの抵抗カバー形状は丸穴です。 ここは、差別化で長穴にしております。 ※写真のファン本体は付属しません。 ※30ファンサイズ用です。 取付難易度は★☆☆☆☆レベル1です。 材 質:アルミ 板 厚:1.5t 個 数:1ケ 対 応:タミヤグラスホッパー専用 付属品:M3トラスねじ×2 発 送:クリックポスト250円 仕 様:板金部品には製品面に加工上傷が入ることがあります。製品上問題はありません。 注 意:素材はアルミです過度に力を加えると変形します。 注 意:素材はアルミです過度に締め付けるとタップが壊れます。 ※ For international shipping inquiries, please contact me directly through BASE messaging! # FANBoo G I DX / Cooling Fan Bracket for Tamiya Grasshopper **Product No.: BKFGDX-001** In 2026, the Tamiya Grasshopper celebrates 42 years since its original release. It's one of the longest-selling RC cars around! With so many color variations available, I'm sure plenty of RC enthusiasts own more than one. Equipped with a standard 380-size motor, it runs just like its namesake — a real grasshopper! It's also a fantastic RC car for those who love modifying and customizing their machines. And personally, I think it's one of those RC cars you can never have too many of! So, we created something a little special for the Grasshopper. A deluxe part that not only helps cool the motor, but also adds a stylish touch to the plastic body — complete with a dummy cement resistor cover! Introducing... **FANBoo G I DX!** --- ## Development Concept The rear of the Grasshopper looks a little plain... What if I added an aluminum plate here...? Ohhh! That cooling fan looks pretty cool back there! I should turn this into a product so other RC enthusiasts can enjoy it too! And of course, I want to keep the price affordable! Wait a minute... **Why not include the aluminum plate from KAVADON as well?!** And that's how the FANBoo G I DX was born! I'm sure many Grasshopper owners have already created their own DIY cooling fan setups. But how about a **FANBoo G I DX that installs easily without any modifications?** Just fit it quietly, take a look at the finished result, and enjoy that little... **"Mufufu..." moment!** Oh, and one more detail! The original Grasshopper's resistor cover had round holes when it was first released. For this product, we've deliberately chosen elongated slots to give it a distinctive look. A little difference, just for fun! ### Important Notes - The cooling fan shown in the photos is not included. - Designed for 30 mm cooling fans. ## Product Specifications **Installation Difficulty:** ★☆☆☆☆ (Level 1) - **Material:** Aluminum - **Thickness:** 1.5 mm - **Quantity:** 1 piece - **Compatibility:** Tamiya Grasshopper only - **Included Hardware:** M3 truss head screws × 2 - **Domestic Shipping:** Click Post — ¥250 ## Product Notes & Precautions - Minor surface scratches may occur during sheet metal manufacturing. These do not affect the product's functionality. - The product is made of aluminum. Excessive force may cause deformation. - Do not overtighten the screws, as excessive torque may damage the threaded holes in the aluminum.
MORE -

「アヴトロ」(AVTORO)/ マルチコーナーツールベース
¥2,200($14.02)
ピット作業から自宅でのメンテナンス作業にお使いいただける。 「アヴトロ」 マルチコーナーベースです。 :開発コンセプト: 自宅でメンテ作業をしている時に転がるツール。 サーキットのピットでは、ツールボックスから取り出して作業をするのですが、 多数のツールを使用すると、どこに行ったのやら、気づくと転がり落ちるツール。 メンテ作業が滞ったり、落ちたツールを拾おうとして他を落とす事も、、、。 そこで設計をしたのが、 「アヴトロ」/ マルチコーナーツールベース です。 工具箱等に入れて、使うときに一緒にご利用ください。 置き方は特に気にせずに、どこの角を使用してもツールは置くことができます。 また、筆塗り作業の時の相棒としてもお使い頂けます。 ご使用するテーブル等を傷つけたくない場合は、平面部を下にしてご利用ください。 半径3mmの半円弧を9か所加工しましたので、お好きな場所で使用できます。 また、妥協をせず板厚を2mmにしたことで、重量感がありますので安心してご使用できます。 痒い所に手が届く精神の基、この世に無いモノを作りたい。で 生まれた商品の一つです。 ※ For international shipping inquiries, please contact me directly through BASE messaging! (BKAVB-1) 材 質:ステンレス製 板 厚:2.0t 天 面:50mm×20mm×22mm 重 量:28g 内容物:「アヴトロ」/ Multi-Corner BASE Avtoro本体 発 送:クリックポスト350円 仕 様:製品面に加工上傷が入ることがあります。製品上問題はありません。 注 意:ツールに塗布されているコーティングは剥がれることがあります。 注 意:レーザー加工は、故意に擦ると消えてしまいます。 由 来:ゾウの様にがっしりとした商品そんな思いを基に、 エジプト語の「アブウ(abu)」から商品名を決めました。 由 来:家内の好きな動物はゾウです。 # AVTORO / Multi-Corner Tool Base **Product No.: BKAVB-1** Introducing **AVTORO**, the Multi-Corner Tool Base! A handy little companion for everything from RC pit work at the circuit to maintenance sessions at home. ## Development Concept Have you ever been working on your RC car at home, only to find your tools rolling around everywhere? At the circuit, you take your tools out of your toolbox and get to work. But once you're using several tools at the same time, things start to get messy. "Where did I put that tool?" Before you know it, one has rolled off the table. Your maintenance work gets interrupted, and sometimes, while reaching down to pick up the fallen tool, you accidentally knock another one off! Sound familiar? LOL That's exactly why I designed: **AVTORO / Multi-Corner Tool Base!** Keep it in your toolbox and bring it out whenever you need it. There's no need to worry too much about how you position it. You can rest your tools on any of its corners. It's also a handy companion when you're painting RC parts with a brush! If you want to avoid scratching your worktable, place AVTORO with its flat surface facing down. We've machined **nine semicircular grooves with a 3 mm radius (R3)**, so you can choose whichever position works best for your tools. And we didn't compromise on the material thickness. Made from **2.0 mm thick stainless steel**, AVTORO has a reassuring weight and solid feel despite its compact size. This is another product born from the BAnkyRC philosophy: **"Create something that doesn't exist yet — something that solves those little frustrations."** That's the spirit behind AVTORO! **For international shipping inquiries, please contact me directly through BASE messaging!** --- ## Product Specifications - **Product Name:** AVTORO / Multi-Corner Tool Base - **Product No.:** BKAVB-1 - **Material:** Stainless steel - **Thickness:** 2.0 mm - **Dimensions:** 50 × 20 × 22 mm - **Weight:** 28 g - **Package Contents:** 1 × AVTORO Multi-Corner Tool Base - **Domestic Shipping:** Click Post — ¥350 ## Product Notes & Precautions - Minor surface scratches may occur during manufacturing. These do not affect the product's functionality. - The coating applied to tools may wear off or peel when they come into contact with AVTORO. - The laser-marked design may wear off if deliberately rubbed or abraded. ## The Story Behind the Name "AVTORO" I wanted to create something solid and sturdy, just like an elephant. That idea led me to the Egyptian word **"Abu" (アブウ)**, which inspired the name AVTORO. And there's one more personal reason behind the name... **My wife's favorite animal is the elephant!** So, in a way, a little bit of that love went into this product, too! That's AVTORO — a small tool base with a big personality!
MORE -

「カバドン」/セメント抵抗ダミーカバータミヤ用
¥1,540($9.82)
タミヤラジコン専用のセメント抵抗ダミーカバー(後期) 【カバドン】です。 昨今、続々と再版されたワクワクの詰まったタミヤRC達。 そのシャーシに、使用していない穴がありませんか? もしその穴が有れば、この【カバドン】を取り付けてあげてください。 きらっ!と輝くカバドン君がきっと、あなたのラジコンライフに プライスレスな気持ちとノスタルジーをプレゼントしてくれると思います。 ※カバドン君を装着する事で、走行性能は向上しません! しかし、愛着はさらに強くなると思います! ダミーカバー後期の形状を意識しているのがカバドン君です! :開発コンセプト: いつかは作らなければと思っていました。 いつか、BAnkyRCが作りたいと思い続けて2年! 貴方のシャーシに幸せの固定スペースが有れば使ってもらいたい。 そんな板金パーツ。 カバドンです! 無駄に、目立たせるためサスで作成しております! ※ For international shipping inquiries, please contact me directly through BASE messaging! (BKKDN1) 組み立て難易度は★⭐︎☆☆☆(レベル1です) 本体の固定にはM3のタッピングネジもしくはその他ネジをご用意下さい。 材 質:SUS304 板 厚:0.8t 研磨材 寸 法:26mm×38mm×12mm 内容物:カバドン本体 対 応:グラスホッパー、グラスホッパーⅡ、スーパーセイバー、ブーメラン、ランチボックス、サンダーショット、 (スーパー)クラッドバスター、Cカー、等、 日々確認更新中です。 ※セメント抵抗固定穴があるシャーシ全てに搭載できるかは寸法の確認が必要です。 日々情報確認中していきます! 付属品:特別ステッカー(高熱注意?!) 発 送:クリックポスト350円 仕 様:板金部品には製品面に加工上傷が入ることがあります。製品上問題はありません。 仕 様: :数量限定販売商品です。 # KAVADON / Dummy Cement Resistor Cover for Tamiya RC Cars (Late-Type) **Product No.: BKKDN1** Introducing **KAVADON**, a late-type dummy cement resistor cover designed for Tamiya RC cars! In recent years, Tamiya has re-released one exciting classic RC car after another. Take a look at your chassis. Do you see any unused mounting holes? If you do, why not give your RC car a little KAVADON? With its beautiful metallic shine, KAVADON might just bring a priceless feeling of nostalgia and happiness to your RC life! **Important!** Installing KAVADON will NOT improve your RC car's driving performance! But I believe it will make you love your RC car even more! KAVADON is designed with the shape of the later-style cement resistor cover in mind. It's a little detail that brings back the spirit of classic Tamiya RC cars! ## Development Concept "I've got to make this someday..." That's what I kept telling myself. For two whole years, I had been wanting to create this part under the BAnkyRC name! And finally, here it is! If your RC chassis has a little mounting space waiting to be filled with happiness, I'd love for you to give KAVADON a home! That's the idea behind this little sheet metal part. **KAVADON!** And because I wanted it to stand out more than it really needs to... **I made it from stainless steel! LOL** A little unnecessary shine? Absolutely! But that's part of the fun! **For international shipping inquiries, please contact me directly through BASE messaging!** --- ## Assembly & Installation **Assembly Difficulty:** ★☆☆☆☆ (Level 1) M3 self-tapping screws or other suitable screws are required to mount KAVADON to your chassis. Please prepare the appropriate screws separately. ## Product Specifications - **Product Name:** KAVADON / Dummy Cement Resistor Cover (Late-Type) - **Product No.:** BKKDN1 - **Material:** SUS304 stainless steel - **Thickness:** 0.8 mm - **Finish:** Polished stainless steel - **Dimensions:** 26 × 38 × 12 mm - **Package Contents:** 1 × KAVADON dummy cover - **Included Accessory:** Special warning sticker ("Caution: High Temperature?!") - **Domestic Shipping:** Click Post — ¥350 ## Compatible RC Models Compatibility has been identified with the following Tamiya RC models: - Grasshopper - Grasshopper II - Super Sabre - Boomerang - Lunch Box - Thunder Shot - Clod Buster / Super Clod Buster - Tamiya Group C Cars - And more! **Compatibility information is being checked and updated regularly.** Please note that the presence of cement resistor mounting holes does not necessarily guarantee compatibility. Always check the dimensions and available mounting space on your chassis before purchasing. We will continue checking and updating compatibility information as more models are confirmed! ## Product Notes - Minor surface scratches may occur during sheet metal manufacturing. These do not affect the product's functionality. - **Limited-quantity product.** Available only while supplies last.
MORE -

「アパバー」(Appbar)/ TT02専用アッパーデッキ
¥1,870($11.92)
タミヤさんのTT02専用のアッパーデッキてす。 (BKAPB-001) ツーリングからラリーまで走らせられて、 数多くの魅力的なボディラインナップが存在するシャーシ TAMIYA TT02。 そんな、TT02の専用パーツを作りました。 商品名は「アパバー」です。 既存のねじを流用して、固定をしてください。 ※不安がある方は、別途ねじをご利用ください。 :アパバーの特徴: シャーシの剛性が向上します。 既存で使用しているタッピングねじM3-10でそのまま固定できます。 アルミですが、板厚2.5mmを採用しておりますの強固です。 ※故意に曲げれば曲がります。 M3のタップを4か所設けました。 その他の部品の固定や、自作改造部品等を取り付ける際にご利用ください。 また、スリット加工にはインシュロックなどを通してご利用いただけます。 (5mm×70mm) 片側の固定穴は長穴になっておりますので、わずかに歪んでいるシャーシにも 固定できるような狙いがあります。 ※ For international shipping inquiries, please contact me directly through BASE messaging! 取付難易度は★★⭐︎☆☆レベル2です。 ※既存のねじを流用して、固定をしてください。 ※不安がある方は、別途ねじをご利用ください。 ※事前に改造をされている場合の干渉確認はご自身でお願いします。 ※TT02SやSR.及びBなどへの装着は、別途スペーサーが必要となります。 (1.5〜5mm以上推奨) 材 質:アルミ 板 厚:2.5t 重 量:35.1g 個 数:1ケ 対 応:タミヤシャーシTT02 付属品:本体のみ 発 送:クリックポスト350円 仕 様:板金部品には製品面に加工上傷が入ることがあります。製品上問題はありません。 注 意:素材はアルミです、固定前に過度に力を加えると変形します。 注 意:既存の改造パーツが取りついている場合の干渉回避は自己責任でお願いしております。
MORE -

【限定生産】「テラガス」/ 3段式タイヤ・ホイールラック
30%OFF ¥5,390($34.36)
30%OFF
限定生産商品 BAnky RCの商品の中で一番重く、そして一番高価な商品となります。 :開発コンセプト: ラジコンを長い期間楽しんでいると、無計画に買っていたのか? と、自問自答したくなるほど増えるタイヤとホイール。 それでも、お気に入りのホイールやタイヤは存在していて、 いざ!という時に、段ボールを漁ったり、ケースの中を探す事が多く 最悪の結果は、4本揃わない事、、、 それならば、逆に展示するタイヤ・ホイールラックが有ればいいんだ!と。 そこで設計をしたのが、 「テラガス」/ 3段式タイヤ・ホイールラック です。 3段式のラックになっており、最大で12本のタイヤが収納できます。 中段のシャフトは、取付穴が選択できますので、 用途に合わせて、ご使用ください。 妥協をせず板厚を2mmにしたことで、重量感がありますので安心してご使用できます。 痒い所に手が届く精神の基、この世に無いモノを作りたい。で 生まれた商品の内の一つです。 (BKTGS-1) 材 質:ステンレス製 板 厚:2.0t 天 面:160mm×50mm×200mm(組み立て時) 重 量:340g(組み立て時) 内容物:「テラガス」/ Movable-Tire Wheel Rack Teragass本体 ラックシャフト12本、トラスねじM3-6mm12本 発 送:クリックポスト350円 仕 様:製品面に加工上傷が入ることがあります。製品上問題はありません。 注 意:レーザー加工は、故意に擦ると消えてしまいます。 由 来:巨獣の様にがっしりとし荒ぶる存在感を、そんな思いを基に、 ギリシャ語の「テラ(téras)/巨獣」から商品名を決めました。
MORE